
 Pin
Pin
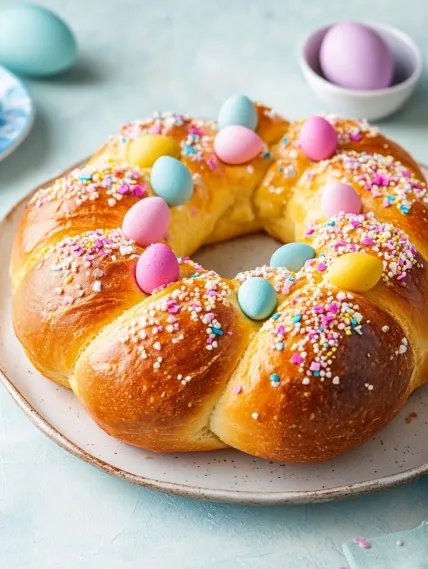
This stunning braided Easter bread combines the rich, buttery flavor of a traditional enriched dough with whimsical holiday decorations that make it as beautiful to look at as it is delicious to eat. Golden, fluffy bread woven into an impressive braid cradles colorful dyed eggs, while a sweet glaze and festive sprinkles add the perfect finishing touch. The result is a show-stopping centerpiece that brings both meaning and joy to your Easter table. With its subtle sweetness and tender texture, this bread provides the perfect balance to all those chocolate eggs and jelly beans, making it a cherished part of Easter celebrations for generations.
I first attempted this Easter bread after seeing my grandmother make a similar version every spring throughout my childhood. What surprised me most was how the simple act of braiding the dough transformed an ordinary bread into something truly special. The first time I brought it to an Easter gathering, everyone was impressed by how beautiful it looked – no one needed to know how straightforward it was to make! Now it's become my signature contribution to holiday meals, with family members requesting it year after year.
Essential Ingredients and Selection Tips
- Active Dry Yeast: The foundation of a successful yeasted bread. Make sure it's fresh for proper rising.
- Milk and Butter: These enriching ingredients create the bread's tender, soft texture. Use whole milk for the richest flavor.
- Eggs: They add richness to the dough and provide the beautiful golden color. Plus, dyed eggs create the bread's festive appearance.
- All-Purpose Flour: Creates the perfect structure. You can substitute up to half with bread flour for a chewier texture.
- Sugar: Balances the flavors and helps feed the yeast for proper rising.
The temperature of your liquids is crucial for successful bread making. I've found that using an instant-read thermometer to ensure your milk and water are around 110°F gives the best results – warm enough to activate the yeast but not so hot that it kills it.
Detailed Cooking Instructions
- Step 1: Activate Your Yeast Properly
- In a small bowl, combine ¼ cup warm water (about 110°F) with 1 tablespoon active dry yeast. Let it stand until foamy, about 5 minutes. This proofing step ensures your yeast is alive and active. In your stand mixer bowl, combine this yeast mixture with ¾ cup warm milk, ½ cup sugar, 6 tablespoons melted butter, and 2 beaten eggs, mixing on medium-low for 30 seconds.
- Step 2: Develop The Perfect Dough Texture
- Add 4½ cups all-purpose flour and 2½ teaspoons salt to your wet ingredients, first mixing with a spatula until a shaggy dough forms. Then, using a dough hook, beat on medium speed for about 5 minutes until the dough becomes smooth, elastic, and slightly tacky but not sticky. Transfer to a greased bowl, cover with plastic wrap, and let rise in a warm spot until doubled in size, about 1 to 1½ hours.
- Step 3: Master The Braiding Technique
- Turn the risen dough onto a lightly floured surface and divide it into 3 equal portions (about 12 ounces each). Roll each portion into an 18-20 inch rope. Arrange the ropes side by side and pinch them together at one end. Braid them by crossing the right rope over the middle one, then the left rope over the new middle one. Continue this pattern until you reach the end, then pinch and tuck the ends underneath for a neat finish.
- Step 4: Create Your Festive Presentation
- Transfer the braid to a parchment-lined baking sheet. If using dyed eggs, gently press them into the spaces of the braid, spacing them evenly. Cover loosely with plastic wrap and let rise again for 30-45 minutes until noticeably puffy. Preheat your oven to 350°F during the last 30 minutes of this second rise. Before baking, brush the bread (not the eggs) with a beaten egg for a shiny golden finish.
- Step 5: Bake And Decorate With Flair
- Bake the loaf for 28-32 minutes until deeply golden brown. Cool completely on a wire rack, about 1½ hours. For the finishing touch, whisk together 1 cup powdered sugar with 2 tablespoons milk until smooth, drizzle over the cooled bread, and immediately top with colorful sprinkles before the glaze sets.

The first time I made this bread, I was nervous about the braiding process. I discovered that the key is to keep the dough ropes an even thickness throughout and to braid with confidence but not too tightly. The dough will expand during the second rise and baking, so a slightly loose braid actually yields the best final look.
The Rich Symbolism of Easter Bread
What I love most about this bread is how it carries such beautiful symbolism that adds meaning to our holiday table. The braided shape traditionally represents the Holy Trinity in Christian faith, while the circle (if you connect the ends) symbolizes eternity and the crown of thorns. The eggs nestled within the bread represent new life and resurrection, central themes of Easter celebrations. I find that sharing these traditions with children as we make the bread together creates a deeper appreciation for the holiday beyond just the Easter bunny and candy hunts. My grandmother always said that breaking bread together symbolizes community, making this recipe not just about the food itself but about gathering loved ones around the table to share in something meaningful.
Family-Friendly Baking Project
This Easter bread has become one of my favorite family traditions because everyone can participate in its creation. I assign different tasks based on ages and abilities – younger children can help dye the eggs the day before and add sprinkles to the finished bread, while older kids can help measure ingredients and even try their hand at braiding the dough. My husband, who claims to have "no baking skills whatsoever," has become surprisingly invested in perfecting the egg wash application for the ultimate golden finish. What started as simply making a recipe has evolved into a cherished family activity that we look forward to each spring, with everyone proud of their contribution to the final beautiful centerpiece.
Make-Ahead Tips and Storage Wisdom
Through years of making this bread for various gatherings, I've developed some strategies for fitting it into busy holiday schedules. You can prepare the dough and complete the first rise the day before – simply punch down the risen dough, cover it tightly, and refrigerate overnight. The next morning, let it come to room temperature for about 30 minutes before dividing and braiding. Alternatively, you can fully bake the bread a day ahead (with or without the eggs), wrap it well, and store at room temperature, adding the glaze and sprinkles just before serving. If you include the eggs, they should be removed if you're not serving the bread within several hours, or the entire bread should be refrigerated. I've found the bread stays fresh for about two days at room temperature if wrapped well, though it's truly at its peak the day it's baked.
Creative Variations to Try
While the traditional version of this bread is beautiful, I've experimented with several variations over the years that have become family favorites. For a more complex flavor, try adding 1 tablespoon of orange zest and ½ teaspoon of cardamom to the dough. For a version that's perfect with coffee, fold ½ cup of golden raisins and 2 tablespoons of anise seeds into the dough before the first rise. I've even made a savory version by omitting the sugar and glaze and instead adding 1 cup of grated parmesan and 2 tablespoons of fresh rosemary to the dough, then topping with coarse salt instead of sprinkles. The basic technique remains the same, but these small changes can create entirely new traditions tailored to your family's tastes.
This Easter bread has transcended being just another recipe in my collection to become a meaningful tradition that marks the season of renewal. The process of creating it – from activating the yeast to braiding the dough to decorating the finished loaf – provides moments of joy and connection. The way it fills the house with the aroma of sweet, fresh-baked bread signals to everyone that it's a special day. And when it finally takes its place at the center of our Easter table, beautiful and golden with its colorful eggs nestled within, it represents not just delicious food but the heart of what holidays are about – gathering together to create and share in something meaningful.
Recipe FAQs
- → Do I need to hard-boil the eggs before adding them to the bread?
- No, you don't need to pre-cook the eggs. The uncooked dyed eggs will cook as the bread bakes, resulting in eggs with a nice soft-set yolk. You can use hard-boiled eggs instead, but they may become a bit overcooked during baking. Either way, make sure the eggs are at room temperature and completely dry before placing them in the dough.
- → Can I make this Easter bread without eggs on top?
- Absolutely! The bread will still be delicious and beautiful without the dyed eggs. The braided shape itself is festive, and with the sweet glaze and sprinkles, it will still make a lovely Easter treat. Simply follow the recipe as written, skipping the step where you tuck the eggs into the braid.
- → How do I prevent the dye from bleeding onto the bread?
- Some color bleeding is normal and adds to the charm, but to minimize it: make sure your dyed eggs are completely dry before using them, ensure they're at room temperature (not cold from the refrigerator), and consider using lighter colors which tend to bleed less. Any color transfer can be covered with glaze and sprinkles after baking.
- → Can I make this bread ahead of time?
- Yes, but with some considerations. The bread is best eaten the day it's made, but you can prepare it a day ahead. If you include the eggs, store the bread in the refrigerator overnight. If you make it without eggs or remove them after baking, you can store the bread at room temperature, tightly wrapped. Wait to add the glaze until shortly before serving for the best presentation.
- → Why is my dough not rising properly?
- The most common reason for dough not rising is that the yeast wasn't activated properly. Make sure your water and milk are warm (about 110°F) but not hot. Too hot will kill the yeast, and too cold won't activate it. Also check that your yeast isn't expired. The dough also needs a warm environment to rise - if your kitchen is cold, try placing the covered dough in an oven that's turned off but with the light on.
- → Can I make this bread without a stand mixer?
- Yes! While a stand mixer makes the process easier, you can mix the dough by hand. After combining ingredients to form a shaggy dough, turn it out onto a floured surface and knead by hand for about 8-10 minutes until smooth and elastic. The dough will be slightly sticky but should become less so as you knead.