
 Pin
Pin
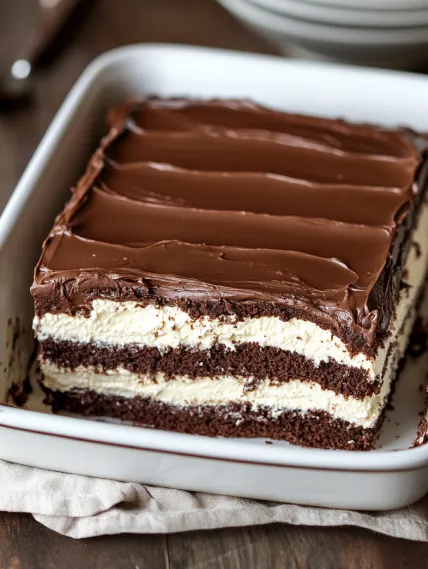
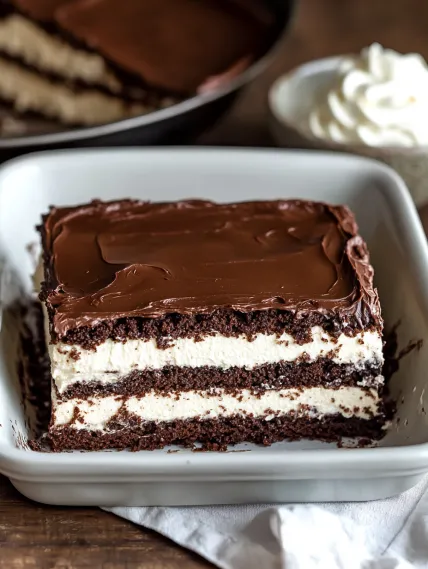
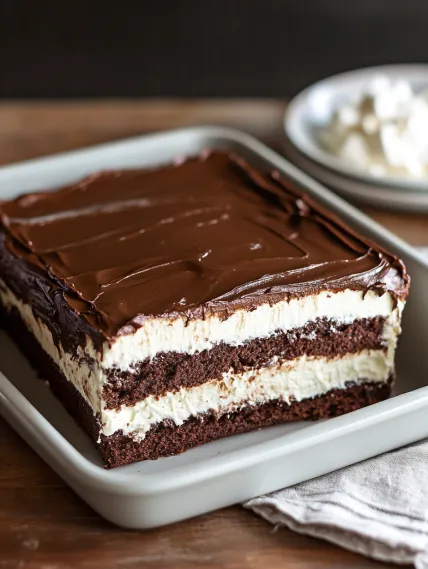
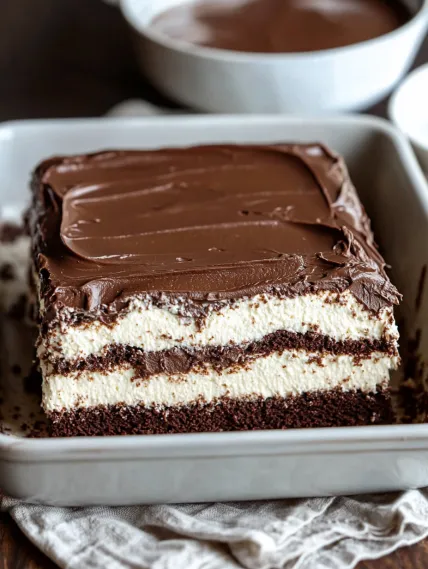
Magically layered Italian Love Cake combines creamy ricotta cheese and rich chocolate cake topped with a dreamy chocolate pudding frosting. This impressive dessert creates distinct layers as it bakes, with the ricotta mixture mysteriously sinking below the chocolate cake to form a cheesecake-like bottom layer.
I first made this cake for my husband's birthday after his Italian grandmother mentioned it was a childhood favorite he hadn't tasted in years. The look on his face when he took the first bite was priceless, a mixture of nostalgia and pure joy. Since then, this cake has become our family's celebration tradition, requested for birthdays, anniversaries, and holiday gatherings.
Essential Ingredients and Selection Tips
- Ricotta Cheese: Choose whole milk ricotta for the creamiest texture. Fresh is best, but packaged works well too. Drain if it seems watery.
- Devil's Food Cake Mix: Any brand works, but those with pudding in the mix create an even moister result.
- Instant Chocolate Pudding Mix: Opt for regular rather than sugar-free for the best frosting consistency.
- Whipped Topping: The stabilized variety in tubs creates a longer-lasting frosting. Homemade whipped cream can be substituted but may not hold up as long.
- Vanilla Extract: Pure extract rather than imitation provides the best flavor in the ricotta layer.
I've discovered that allowing all refrigerated ingredients to come to room temperature before mixing is essential for achieving that magical layer separation during baking. Cold ricotta tends to stay in place rather than creating the mysterious swap with the cake batter.
Detailed Cooking Instructions
- Step 1: Prepare the Creamy Ricotta Layer
- In a large mixing bowl, combine 2 pounds of room temperature ricotta cheese, 1 cup granulated sugar, and 1 teaspoon pure vanilla extract. Beat with an electric mixer until smooth and well combined. Add 4 large eggs one at a time, beating well after each addition. The mixture should be silky smooth without any lumps.
- Step 2: Create the Chocolate Cake Base
- In a separate bowl, prepare the cake batter by combining one box of devil's food cake mix with 1 cup water, 1/2 cup vegetable oil, and 3 large eggs. Beat on medium speed for 2 minutes until the batter is smooth and well incorporated. Pour this chocolate batter into a greased 9×13-inch baking dish, spreading it evenly to the corners.
- Step 3: Begin the Layering Magic
- Carefully pour the ricotta mixture over the cake batter, gently spreading it to cover the chocolate layer completely. Don't worry if it seems like the layers are 'wrong' - during baking, they will mysteriously switch places with the cake rising to the top and the ricotta forming a cheesecake-like bottom layer.
- Step 4: Bake With Patience
- Place the pan in a preheated 350°F oven and bake for 60-70 minutes until the center is set and no longer jiggly. Avoid opening the oven door during the first 45 minutes of baking to prevent the cake from sinking. The cake is done when a toothpick inserted in the center comes out clean or with a few moist crumbs.
- Step 5: Finish With Cloud-Like Frosting
- After the cake has cooled completely (at least one hour at room temperature followed by one hour in the refrigerator), prepare the frosting. In a large bowl, whisk together one package of instant chocolate pudding mix and 1 cup cold milk for 2 minutes. Fold in 8 ounces of thawed whipped topping until no streaks remain. Spread this fluffy mixture over the cooled cake and refrigerate for at least 4 hours or overnight before serving.
The first time I attempted this recipe, I was intimidated by the assembly process. After several lopsided attempts, I realized that simple pleats work just as well as perfect ones - the flavor remains delicious regardless. Now my children help with the folding, creating their own unique styles that have become part of our family tradition.
The Secret to Perfect Texture
The magic of these cookies lies in their contrasting textures - crispy bottoms and tender, flavorful fillings. I've found that the key to achieving this is controlling moisture at every stage. First, properly squeezing the salted cabbage removes excess water that would otherwise make the filling soggy. Second, the cornstarch not only binds the filling but also absorbs any remaining moisture. Finally, the cooking technique - first frying, then steaming, then frying again - creates that signature crispy bottom while ensuring the filling cooks through perfectly.
Make-Ahead Magic for Entertaining
One of the greatest advantages of this recipe is its make-ahead flexibility. I often prepare this in stages when hosting: shape and freeze the balls up to a month in advance, bread them the day before (storing them covered in the refrigerator), and then simply bake them before guests arrive. The aroma of these baking fills the house with an irresistible scent that sets the tone for a delicious gathering. For larger parties, I make double batches, keeping the second batch warm in a low oven until needed.
Transforming Leftovers Into New Meals
If you somehow end up with leftover cookies (though this rarely happens in my house!), they can be transformed into entirely new dishes. Crumble them into scrambled eggs for a French-inspired breakfast hash, or slice them and add to a simple green salad with a spicy vinaigrette for a light lunch. My favorite repurposing trick is to nestle halved cookies atop a bowl of creamy grits, creating a satisfying breakfast that carries the flavors into the next day.
Chef's Helpful Tips
- Allow the balls to rest for 5 minutes after baking before serving – this helps set the interior for the perfect bite
- For extra flavor dimension, add a teaspoon of smoked paprika to your panko mixture
- If you have trouble finding cookies locally, order them online from authentic suppliers like Bourgeois Meat Market or The Best Stop
- Serve with multiple dipping options – a spicy remoulade and cool ranch alongside the Louisiana dipping sauce
- For a festive presentation, arrange the balls on a platter with alternating sprinkles of chopped parsley, purple cabbage, and yellow bell pepper to represent the traditional green, purple, and gold
Recipe FAQs
- → Why do the cake layers switch places during baking?
- The magic happens because of density differences. The heavier chocolate cake batter sinks to the bottom during baking, while the lighter ricotta mixture rises to the top. The eggs in the ricotta layer also help it rise and set as it bakes, creating that distinct separation between layers that makes this cake so special.
- → Can I use low-fat ricotta or other substitutes?
- While whole milk ricotta works best for richness and texture, you can use low-fat ricotta cheese if preferred. However, avoid using fat-free versions as they may affect the cake's texture and the layer-switching effect. Also, make sure to drain any excess liquid from the ricotta before using it to prevent a soggy cake.
- → Why does my cake need to refrigerate for so long?
- The long refrigeration time (at least 4 hours or preferably overnight) is crucial for two reasons: it allows the cake to fully set, especially the creamy ricotta layer, and it gives time for the flavors to meld together. This results in better texture and taste. Think of it like tiramisu or cheesecake - they always taste better the next day!
- → Can I freeze this cake?
- Yes, this cake freezes well! After it has completely chilled and set, cut it into portions, wrap them individually in plastic wrap, and then in aluminum foil or place in freezer bags. Freeze for up to 2 months. Thaw overnight in the refrigerator before serving. The texture of the whipped topping in the frosting might change slightly but will still be delicious.
- → What if I don't have instant pudding mix?
- If you don't have instant pudding mix, you can make a chocolate ganache instead. Heat 1 cup of heavy cream just until it begins to simmer, then pour over 8 ounces of chopped semi-sweet chocolate. Let sit for 2 minutes, then stir until smooth. Allow to cool and thicken before spreading over the cake. Another option is a simple chocolate buttercream frosting.
- → How do I know when the cake is done baking?
- This cake is tricky to test for doneness since the ricotta layer on top will always appear soft and slightly jiggly. The best indicator is to look for set edges where the cake is pulling away slightly from the sides of the pan. A toothpick inserted should come out with moist crumbs but not wet batter. If the top is browning too much but the cake isn't done, loosely cover with aluminum foil and continue baking.