
 Pin
Pin
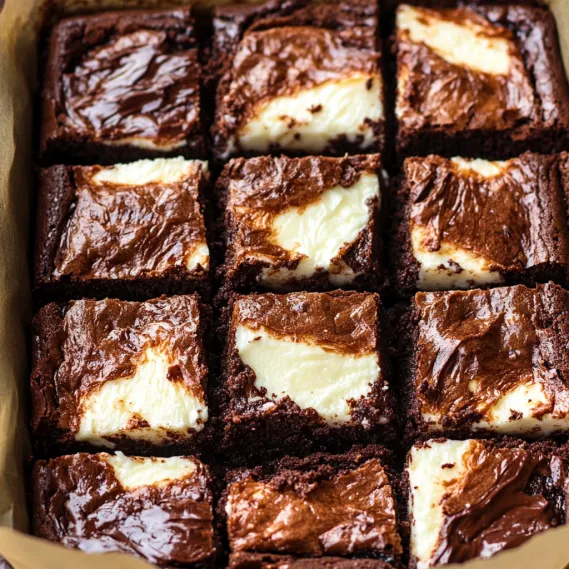
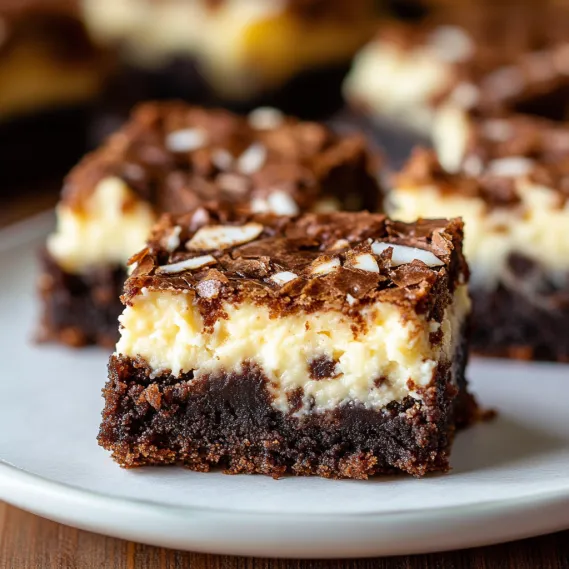
These indulgent Coconut Cheesecake Brownies create an unforgettable flavor experience with each perfect bite – fudgy, moist chocolate brownies interwoven with creamy coconut cheesecake swirls that deliver a delightful contrast of textures and tastes. The rich, deep chocolate of the brownie base provides the perfect canvas for the tangy, tropical cheesecake ribbons studded with sweetened coconut flakes. This dessert masterpiece combines three beloved classics – brownies, cheesecake, and coconut cream pie – into one irresistible treat that satisfies multiple cravings at once and promises to become an instant favorite among friends and family.
I first made these for a potluck where I wanted to bring something beyond the usual dessert options. The pan was completely empty within minutes, with several people asking for the recipe. What surprised me most was how even those who claimed not to like coconut were won over by the perfect balance of flavors. The subtle tropical notes of the coconut cheesecake perfectly complement the deep chocolate brownies, creating something truly greater than the sum of its parts.
Essential Ingredients and Selection Tips
- Cocoa Powder: Use natural unsweetened cocoa powder for the deepest chocolate flavor.
- Vegetable Oil and Butter: This combination creates the perfect moist, fudgy texture that doesn't dry out.
- Cream Cheese: Full-fat cream cheese provides the best flavor and texture; avoid light versions which contain more moisture.
- Coconut Extract: Essential for amplifying the coconut flavor which might otherwise be overshadowed by the intense chocolate.
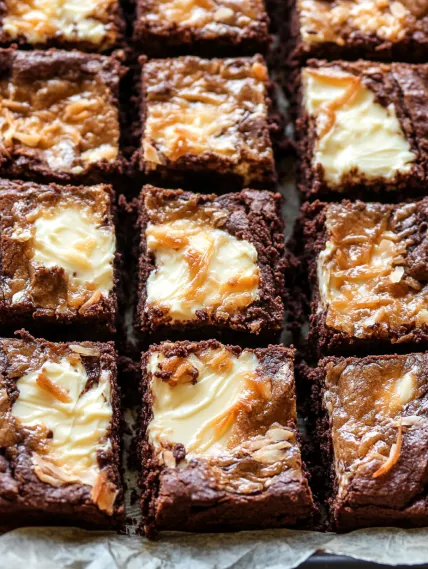
- Sweetened Shredded Coconut: Adds texture and flavor to the cheesecake swirl. Toast it lightly first for enhanced flavor if desired.
I've found that using room temperature cream cheese and eggs is absolutely crucial for a smooth cheesecake batter. Cold ingredients don't blend properly and can leave you with unwanted lumps that affect both texture and appearance of the final brownies.
Detailed Cooking Instructions
- Step 1: Prepare Your Perfect Base
- Preheat your oven to 350°F and line a 9-inch square baking pan with parchment paper, leaving overhang on the sides for easy removal. In a large bowl, use an electric mixer to beat 8 ounces softened cream cheese, 2 tablespoons softened butter, and ¼ cup sugar until smooth and creamy. Add 1 egg, 3 tablespoons flour, ½ teaspoon coconut extract, and ¾ cup sweetened shredded coconut, mixing until just combined.
- Step 2: Create Fudgy Brownie Batter
- In another bowl, whisk together ¾ cup granulated sugar, ¼ cup packed brown sugar, ⅓ cup melted butter, ¼ cup vegetable oil, and 2 eggs until completely smooth. Add 2 teaspoons vanilla extract, then whisk in ¾ cup all-purpose flour, ½ cup unsweetened cocoa powder, and ¼ teaspoon salt until just combined. Fold in ½ cup chocolate chips, which help create that beautiful shiny top crust.
- Step 3: Master The Perfect Swirl
- Spread about ⅓ of the brownie batter in the prepared pan as your base layer. Drop spoonfuls of the coconut cheesecake mixture randomly on top, then gently swirl with a knife. Add another ⅓ of brownie batter in dollops, followed by more cheesecake mixture, and swirl again. Finish with remaining batters, creating a final swirl pattern that's visually appealing but not overmixed.
- Step 4: Bake With Precision
- Place the pan in the preheated oven and bake for 35-40 minutes, or until a toothpick inserted in the center comes out with a few moist crumbs. The center should be just set but not completely firm as it will continue to cook slightly as it cools. Overbaking will dry out the brownies and diminish their fudgy texture.
- Step 5: Cool Completely Before Cutting
- Allow the brownies to cool completely in the pan set on a wire rack, about 2-3 hours. Once cooled, use the parchment overhang to lift the brownies out of the pan and slice with a sharp knife. For the cleanest cuts, wipe the knife clean between slices and refrigerate the brownies for 30 minutes before cutting.
I learned the importance of patience with these brownies the hard way. My first batch was cut too soon while still warm, resulting in messy slices that fell apart. Now I make them a day ahead when possible, allowing them to set completely for perfect, photo-worthy squares.
The Secret To Perfect Wok Technique
High heat is essential for authentic fried rice. My grandmother taught me to heat the wok until smoking before adding oil. Keep ingredients moving constantly to achieve that elusive "wok hei" flavor. Never overcrowd the pan—cook in batches instead. This technique transformed my fried rice into restaurant-quality perfection.
Making The Most Of Leftovers
This dish excels at transforming leftovers into something exciting. I've used roast chicken, holiday ham, and even Thanksgiving turkey with great success. Cut meat into uniform pieces that distribute evenly throughout. Leftover grilled steak adds incredible depth with its smoky edges. Even roasted vegetables bring delightful caramelized sweetness.
Balancing Flavors And Textures
Special fried rice succeeds through balanced components. Char siu provides richness, prawns add sweetness, eggs contribute silkiness, while vegetables offer freshness. The sequence matters—aromatics first build flavor, eggs midway remain distinct, vegetables maintain crispness. Adding spring onions last preserves their brightness for that authentic restaurant finish.
Customization For Dietary Needs
This dish adapts easily to dietary restrictions. For vegetarians, I omit meat, double eggs and add extra vegetables. Low-carb diners enjoy my cauliflower rice version that carries flavors beautifully. For gluten-sensitive guests, tamari replaces soy sauce while ensuring chicken powder is certified gluten-free. Everyone enjoys this beloved dish regardless of restrictions.
Creating Perfect Swirl Patterns
The art of swirling creates both visual appeal and flavor distribution in these brownies. I've perfected a few techniques that create beautiful results without overmixing. For a classic marbled look, use a butter knife inserted about half an inch into the batter and make figure-eight motions. For a more dramatic pattern, try using a chopstick to create finer lines. One of my favorite techniques is to use the back of a spoon to create swirls that resemble waves. Remember that less is more – just a few strategic swirls will create the most attractive pattern. The contrast between the dark brownie and light cheesecake batters creates a striking visual that makes these brownies as beautiful as they are delicious.
Serving Suggestions For Maximum Impact
These brownies are impressive on their own, but a few simple touches can elevate them to restaurant-quality dessert status. For casual gatherings, I cut them into generous squares and dust lightly with cocoa powder before arranging on a simple white platter. For more formal occasions, I serve smaller pieces on dessert plates with a dollop of lightly sweetened whipped cream and a sprinkle of toasted coconut. During the holidays, I often add a drizzle of warm chocolate sauce or caramel and a few fresh berries for color. These brownies also make an incredible base for ice cream sundaes – top with a scoop of vanilla ice cream, chocolate sauce, and a cherry for a decadent treat that combines the best of brownies and ice cream.
Troubleshooting Common Issues
Through many batches of these brownies, I've encountered and solved several common problems. If your cheesecake swirl sinks to the bottom, your brownie batter may be too thin – try adding the flour more gradually and being careful not to overmix. If your brownies come out too cakey rather than fudgy, you may have used too much flour or overbaked them – remember that they continue to set as they cool. If the coconut flavor isn't pronounced enough, increase the coconut extract by ¼ teaspoon and consider toasting your coconut before adding it to the cheesecake mixture. For brownies that crack too much on top, your oven temperature may be too high – consider reducing by 25 degrees and extending the baking time slightly. These simple adjustments will help you achieve perfect results every time.

These Coconut Cheesecake Brownies have become my signature dessert, requested for birthdays, potlucks, and holiday gatherings. The combination of rich chocolate, tangy cheesecake, and tropical coconut creates a dessert experience that's truly memorable. While they might take a bit more effort than standard brownies, the rave reviews and empty plate you'll receive in return make every extra minute worthwhile. These are not just brownies – they're a celebration of indulgence and flavor that's sure to impress even the most discerning dessert lovers.
Recipe FAQs
- → Can I use unsweetened coconut instead of sweetened shredded coconut?
- While you can substitute unsweetened coconut, it's not recommended for the best results. Sweetened shredded coconut is moister than unsweetened, which makes a significant difference in the cheesecake swirl's texture. If unsweetened is all you have, give the coconut flakes a rough chop before using them, and be aware that both the texture and sweetness level of the final product will be different. You might consider adding an extra tablespoon of sugar to the cheesecake batter to compensate for the missing sweetness.
- → How do I know when these brownies are properly baked?
- The perfect doneness for these brownies is when a toothpick inserted in the center comes out with just a few moist crumbs attached - not completely clean (which would indicate overbaking) and not with wet batter (which would mean underbaking). Because of the cheesecake swirl, the toothpick test might be a bit tricky to interpret. The edges should be set and slightly pulled away from the sides of the pan, while the center should no longer look wet or shiny but should still have a slight jiggle, similar to a cheesecake. Remember to tent with foil after 25 minutes to prevent over-browning.
- → What if I don't have coconut extract?
- If you don't have coconut extract, you have a few options: 1) You could substitute with vanilla extract, though you'll lose some of the coconut flavor intensity; 2) Use coconut rum instead (same amount); 3) For a non-alcoholic alternative with more coconut flavor, use 1-2 tablespoons of cream of coconut (like Coco Lopez), reducing the sugar by 1 tablespoon; or 4) Simply omit it entirely - you'll still have coconut flavor from the shredded coconut, just more subtle. The brownies will be delicious regardless!
- → Can I make these brownies ahead of time for a party?
- Yes, these brownies are excellent for making ahead! You have several options: 1) Make them 1-2 days ahead and store in the refrigerator - the flavors actually meld and improve; 2) Freeze the baked and cooled brownies for up to 3 months, well-wrapped in parchment between layers and stored in an airtight container; 3) Thaw frozen brownies overnight in the refrigerator before serving. For the best texture when serving refrigerated brownies, let them come to room temperature for about 20-30 minutes before serving.
- → Why is my brownie batter so thick?
- The brownie batter in this recipe is supposed to be quite thick - that's what gives these brownies their fudgy texture! The thickness comes from the high ratio of cocoa powder to flour and the limited amount of liquid ingredients. If your batter seems excessively thick and difficult to spread, there are a few possible causes: 1) The butter/oil mixture might have cooled too much before adding the eggs; 2) You might have packed the flour or cocoa powder too firmly when measuring; or 3) The chocolate chips may have been added while the batter was still warm, causing them to melt and thicken the mixture. You can add 1-2 teaspoons of milk to slightly thin it if needed.
- → Can I use a larger pan if I don't have a 9-inch square pan?
- If you don't have a 9-inch square pan, you have a few options: 1) An 8-inch square pan will work, but the brownies will be thicker and may need an extra 5-7 minutes of baking time; 2) A 9-inch round pan has a similar volume and will work with the same baking time; 3) A 7×11-inch rectangular pan also has a similar volume. Avoid using a 9×13-inch pan unless you're doubling the recipe, as the brownies would be too thin and likely overbake. Whatever pan you use, make sure to line it with parchment paper with overhang for easy removal.