
 Pin
Pin
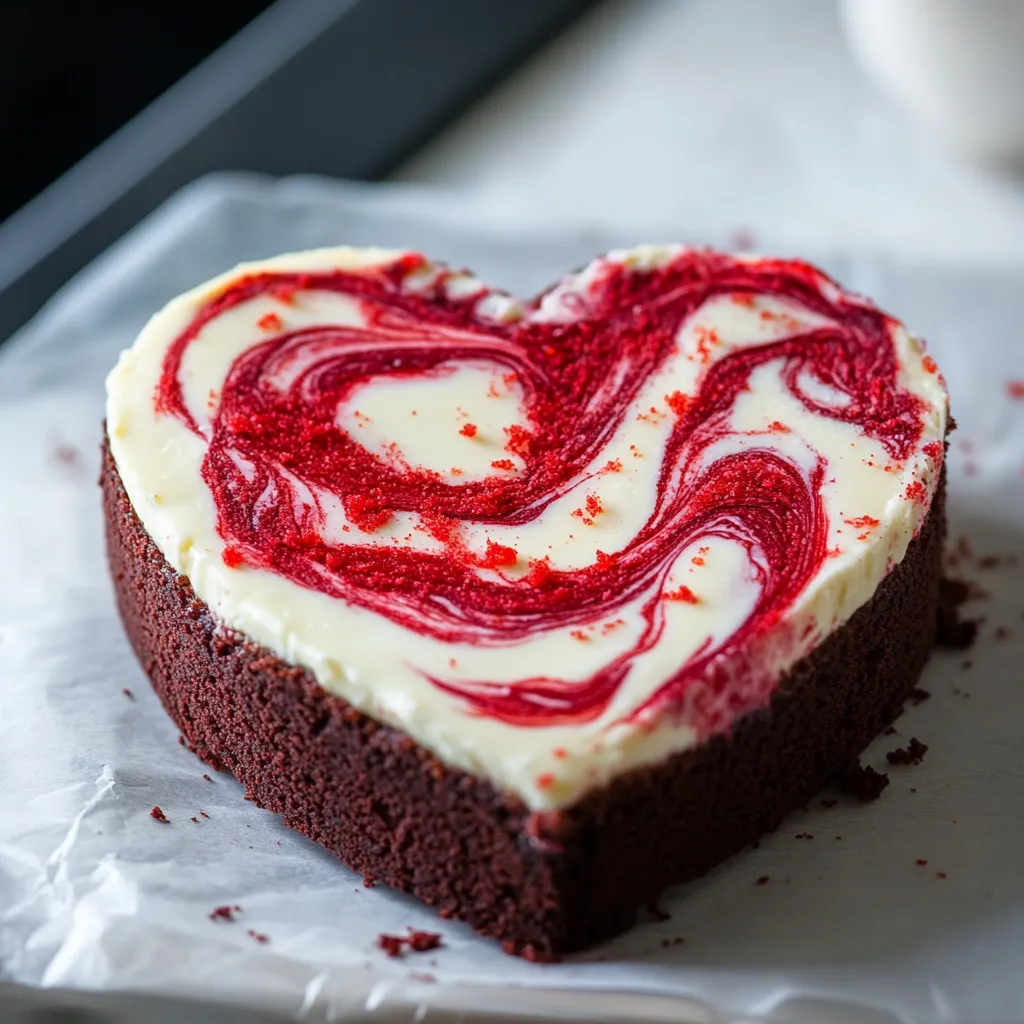
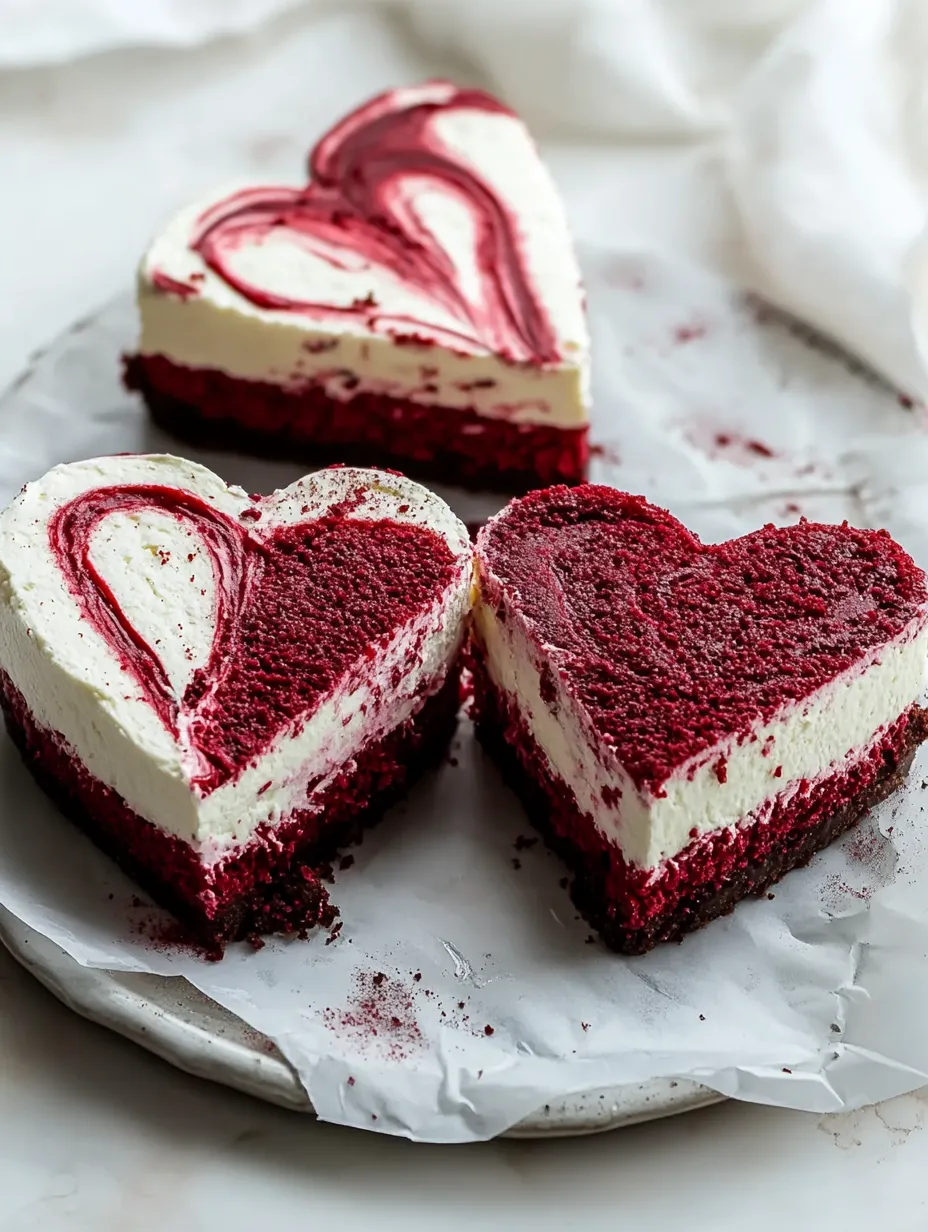
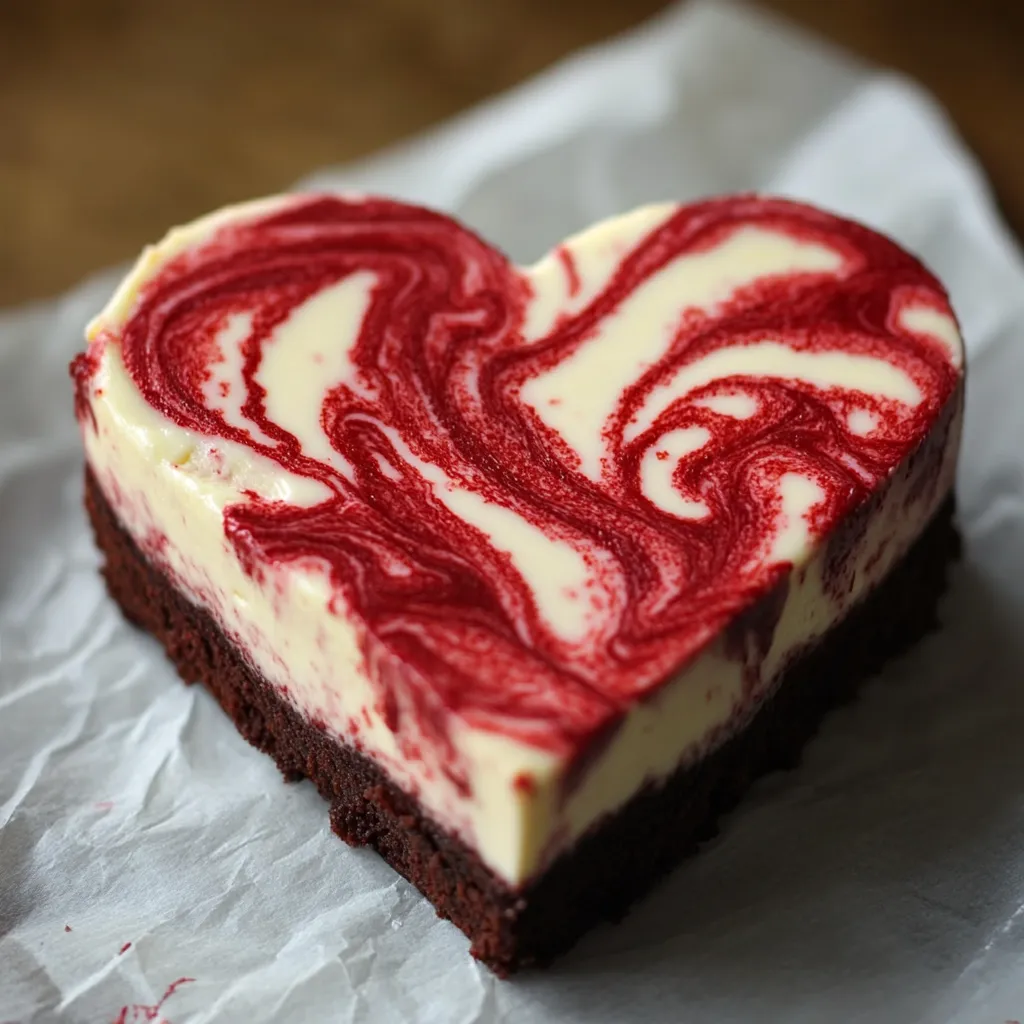
A luxurious Red Velvet Cheesecake combines two beloved desserts into one show-stopping creation. Each slice reveals perfect layers - a rich red velvet base crowned with silky cheesecake, creating an indulgent dessert that's both visually stunning and irresistibly delicious.
The first time I made this cheesecake for my daughter's birthday, the gasps when I cut into it made all the careful preparation worthwhile. The contrast between deep red cake and creamy white cheesecake creates such a beautiful presentation that guests always reach for their phones before their forks.
Essential Ingredients
- Cream Cheese: Full-fat, room temperature for perfect smoothness. I recommend Philadelphia brand for consistent results
- Unsalted Butter: High-quality European style for richer flavor
- Large Eggs: Room temperature for better incorporation
- Semisweet Chocolate: Finely chopped premium chocolate, not chips
- All-Purpose Flour: Spoon and level for accurate measurement
- Pure Vanilla Extract: Never imitation for best flavor
- Red Food Coloring: Gel provides intense color without excess liquid
- Greek Yogurt: Full-fat for tanginess and moisture
STEP-BY-STEP PREPARATION
- 1. Initial Setup:
- Position oven rack centrally at 325°F. Prepare ingredients at room temperature. Grease 9-inch springform pan, line bottom with parchment. Double-wrap outside with heavy-duty foil. Organize workspace into stations: melting station, mixing station, and assembly area. Measure all ingredients before starting.
- 2. Red Velvet Base:
- Create a double boiler with simmering water. Melt butter and chocolate together, stirring occasionally until smooth. Meanwhile, whisk dry ingredients in a separate bowl. Using stand mixer, cream butter and sugar until light, about 3-4 minutes. Add eggs one at a time, scraping bowl between additions.
- 3. Making Perfect Batter:
- Alternate adding dry ingredients and buttermilk to creamed mixture, starting and ending with dry. Mix just until combined after each addition. Add vanilla and red food coloring gradually until reaching desired deep red color. Scrape bowl thoroughly, ensuring no unmixed portions remain.
- 4. Cheesecake Layer:
- Beat cream cheese until completely smooth and lump-free, about 3-4 minutes. Gradually add sugar while mixing. Add eggs one at a time, incorporating fully between each addition. Mix in vanilla and lemon zest. Beat until silky smooth but don't overmix.
- 5. Assembly and Baking:
- Pour red velvet batter into prepared pan, smoothing top. Carefully layer cheesecake mixture over red velvet base. Place in larger roasting pan, fill with hot water halfway up springform pan. Bake 1 hour 15 minutes until edges are set but center slightly jiggly.
ADDITIONAL INFORMATION
- The Perfect Texture Story:
- During my pastry training, I learned the secret to perfect cheesecake texture lies in patience. Room temperature ingredients, gentle mixing, and proper cooling create that silk-like consistency. My mentor's voice still echoes: "Rush the process, and you'll taste the haste in every bite."
- Water Bath Mastery:
- Understanding water bath chemistry transformed my cheesecake game. The moist heat environment prevents cracking and ensures even baking. I discovered this after many failed attempts - now I wouldn't dream of baking a cheesecake without one. It's like giving your dessert a protective spa treatment.
- Temperature Control Wisdom:
- Proper temperature management makes or breaks this recipe. I learned this watching my grandmother, who would press her palm against the cream cheese - if it still felt cool, she'd wait longer. This patience ensures your ingredients blend seamlessly, creating that signature velvety texture.
You Must Know
- Never open the oven door during baking - temperature drops cause cracking
- The cheesecake center should still have a slight wobble when done
- Cooling must be gradual to prevent surface cracks
- Room temperature ingredients are non-negotiable for smooth texture
My family particularly treasures the moment when we cut into this cheesecake. The way my daughter's eyes light up at the perfect red and white layers makes every careful step worthwhile. Now it's become our signature celebration dessert.
Chef's Helpful Tips
- Wrap your springform pan twice with heavy-duty foil to prevent water seepage
- Use cream cheese straight from the refrigerator for clean slices
- Let the red velvet layer set slightly before adding cheesecake mixture
- Keep a spare vanilla bean pod in your sugar container for enhanced flavor
- Always use gel food coloring for intense red without affecting texture
Creating this Red Velvet Cheesecake has taught me that sometimes the most impressive desserts come from combining classics in unexpected ways. Whether it's a holiday gathering, birthday celebration, or simply because you deserve something special, this dessert never fails to create memorable moments around the table. The key to its success lies not just in the ingredients, but in the love and patience you put into each step. As my grandmother always said, "A rushed cheesecake is a ruined cheesecake" - words that ring true with every perfect slice.
Recipe FAQs
- → Can I make this ahead of time?
- Yes, make up to 3 days ahead and store in the refrigerator. Cut into hearts just before serving.
- → What can I do with the leftover scraps?
- The scraps make delicious treats! Enjoy them as-is or crumble over ice cream.
- → Can I freeze this dessert?
- Yes, freeze whole or individual hearts for up to 2 months. Thaw overnight in the refrigerator.
- → Why add greek yogurt to the cheesecake?
- Greek yogurt adds tanginess and helps create a smoother, creamier texture.
- → Can I use different food coloring?
- Yes, but gel food coloring works best for achieving the deep red color without affecting texture.