
 Pin
Pin
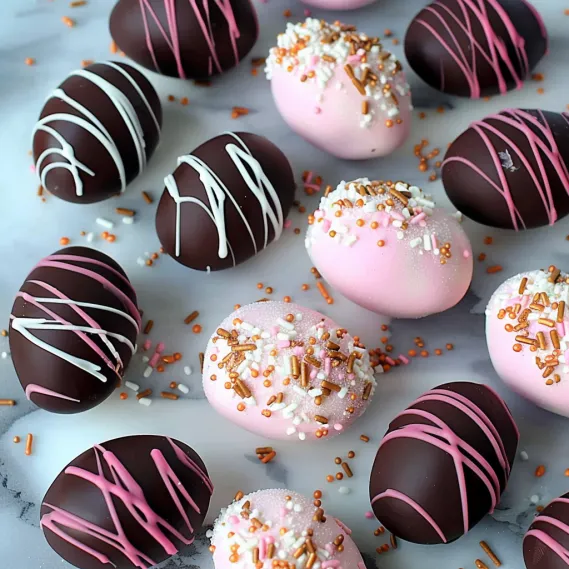
There's something truly magical about biting into a homemade marshmallow Easter egg covered in rich chocolate. The delicate, airy sweetness of the marshmallow against the snap of chocolate creates an irresistible treat that elevates Easter basket goodies to an entirely new level. When I first attempted these charming eggs, I wasn't sure what to expect – would homemade marshmallows really be worth the effort? The answer is a resounding yes! These fluffy confections bear little resemblance to their store-bought counterparts, offering a cloud-like texture and fresh vanilla flavor that's impossible to resist.
I first made these with my children last Easter, and their eyes widened with wonder as we transformed simple ingredients into something magical. My youngest, who typically avoids sticky situations, happily plunged his hands into the process once he realized we were essentially playing with edible cloud-like fluff. Even my teenage daughter, who maintains a carefully curated "too cool" image, couldn't resist getting involved – especially when chocolate dipping began.
Essential Ingredients and Selection Tips
- Unflavored Gelatin: Look for Knox brand in the baking aisle, usually sold in small boxes containing four envelopes. Each envelope contains about 2.5 teaspoons of gelatin
- Granulated Sugar: Regular white sugar creates the perfect sweetness and texture. This is not the place for alternative sweeteners as they will affect how the marshmallows set
- Light Corn Syrup: This prevents crystallization during the sugar-cooking process, creating that distinctive marshmallow texture. Don't worry – the final product won't taste like corn syrup
- High-Quality Chocolate: Splurge on the good stuff here, like Ghirardelli bittersweet or semisweet baking bars. The better the chocolate, the more impressive your final eggs
The star of this recipe is definitely the homemade marshmallow itself. The first time I made these and tasted fresh, fluffy marshmallow, I wondered why I'd waited so long to try making them. The texture is incomparable – like biting into a sweetened cloud with delicate hints of vanilla.
Detailed Cooking Instructions
- Step 1: Create Your Egg-Shaped Molds
- Fill a 9x13-inch baking dish with all-purpose flour, smoothing the top completely with the back of a spoon or flat spatula. Press a plastic Easter egg halfway into the flour to create perfect egg-shaped cavities, spacing them about an inch apart for easy removal. Dust your hands with powdered sugar if the flour sticks to them during the molding process.
- Step 2: Prepare and Cook the Sugar Mixture
- Sprinkle gelatin over cold water in your stand mixer bowl and let it bloom while you work. Combine sugar, corn syrup, salt and water in a saucepan and heat without stirring until the mixture reaches exactly 240°F (soft-ball stage). Remove from heat immediately when it reaches temperature to prevent the sugar from caramelizing.
- Step 3: Whip the Marshmallow Fluff
- With the mixer on low speed, slowly pour the hot sugar syrup into the bloomed gelatin in a steady stream. Gradually increase the speed to high and continue beating for 12-15 minutes until the mixture becomes thick, white, and triples in volume. Add vanilla extract during the final minute of beating for the perfect flavor foundation.
- Step 4: Fill the Molds and Set
- Transfer the marshmallow mixture to a piping bag or plastic zip-top bag with a corner snipped off and quickly pipe into the flour molds before it sets. Fill each cavity completely, using a wet finger to smooth the tops if necessary. Allow the marshmallows to set uncovered at room temperature for at least 3 hours or overnight until firm.
- Step 5: Dust and Dip in Chocolate
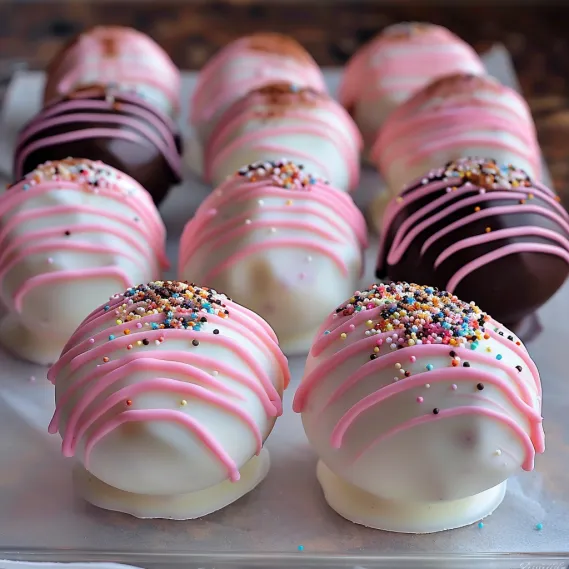
- Gently remove set marshmallows from the flour, brushing off excess with a soft pastry brush, then dust with a mixture of cornstarch and powdered sugar. Melt high-quality chocolate using a double boiler or microwave, then dip each marshmallow egg completely, tapping off excess and placing on parchment paper to set. Add sprinkles or decorations while the chocolate is still wet, then allow to set completely before packaging or serving.
My first attempt at these eggs taught me valuable lessons about patience and timing. I rushed the piping process and ended up with marshmallow strands decorating my kitchen like festive webbing. Now I know to have everything prepared before the marshmallow is ready and to work methodically but efficiently once it's time to fill the molds.
Serving Inspiration
These chocolate-covered marshmallow eggs make stunning additions to Easter baskets, of course, but their presentation possibilities extend far beyond that. Arrange them on a beautiful serving platter garnished with edible grass made from shredded coconut tinted green with food coloring. For a spring brunch, place one at each place setting as an edible place card by adding a small name tag attached with a pastel ribbon. They also make wonderful gifts when packaged in clear cellophane bags tied with pretty ribbons.
Creative Variations
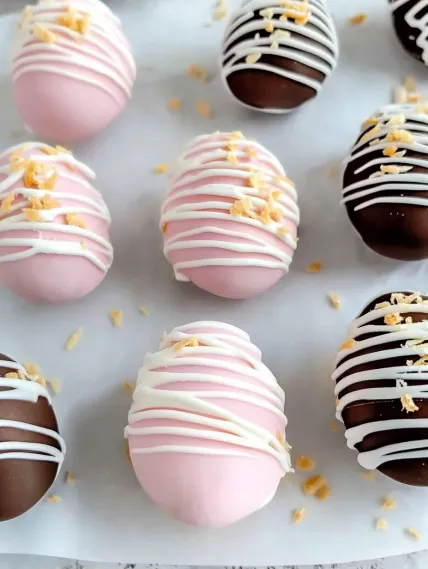
While the classic vanilla marshmallow with chocolate coating is divine, there are endless ways to customize these eggs. For flavor variations, add a few drops of peppermint or almond extract to the marshmallow, or replace the vanilla with strawberry or orange extract for fruit-flavored eggs. The chocolate coating offers another opportunity for creativity – try white chocolate tinted pastel colors with food coloring, or drizzle contrasting chocolate over the base coat. For a more elaborate presentation, decorate with royal icing flowers or pipe designs with colored white chocolate.

Storage Tips
These marshmallow eggs keep beautifully for up to two weeks when stored properly. Place them in an airtight container with layers separated by parchment paper to prevent sticking. Store at cool room temperature rather than in the refrigerator, as refrigeration can cause the chocolate to develop condensation when brought back to room temperature. For gifting, package individual eggs in clear cellophane bags tied with pastel ribbons, or arrange several in decorative Easter boxes lined with colored tissue paper.
What began as a curious kitchen experiment has become one of my favorite Easter traditions. There's something deeply satisfying about transforming simple ingredients into these professional-looking treats that bring such joy to family and friends. The process itself becomes a memorable part of our holiday celebration – flour-dusted noses, sticky fingers, and all. While they may seem intimidating at first glance, these homemade marshmallow Easter eggs are surprisingly accessible even for novice candy makers, and the results are absolutely worth the effort.
Recipe FAQs
- → Can I make these marshmallow eggs without corn syrup?
- While this recipe traditionally uses corn syrup which helps create the smooth texture and prevents crystallization, you could try substituting with honey or golden syrup (like Lyle's). The flavor will be slightly different, and the texture might not be identical, but they can work in a pinch. Use the same amount as called for with corn syrup. Some candy makers also use a homemade invert sugar syrup as a substitute, but this requires more advanced techniques.
- → Do I need a candy thermometer to make these?
- Yes, a candy thermometer is strongly recommended for this recipe. Getting the sugar syrup to exactly 240°F (soft ball stage) is crucial for proper marshmallow texture. Without a thermometer, you risk either undercooked, too-soft marshmallows or overcooked, tough ones. If you absolutely don't have a candy thermometer, you can try the cold water test (dropping a bit of syrup into cold water to see if it forms a soft ball), but results will be less reliable.
- → What type of chocolate works best for dipping?
- Good quality chocolate chips or chopped chocolate bars work well. Semi-sweet or dark chocolate (around 50-60% cacao) provides a nice balance with the sweet marshmallow. For the smoothest coating, chocolate specifically made for melting and dipping (like Ghirardelli melting wafers or Wilton Candy Melts) works excellently. If using regular chocolate bars or chips, adding a teaspoon of coconut oil or shortening per cup of chocolate can help achieve a smoother consistency for dipping.
- → Can I make these marshmallow eggs in advance?
- Yes! These marshmallow eggs can be made 5-7 days ahead of when you plan to serve them. Store them in an airtight container in the refrigerator. The chocolate coating actually helps preserve the marshmallow and prevents it from drying out. Just be sure to bring them to room temperature for about 15-20 minutes before serving for the best texture and flavor.
- → Why did my chocolate develop white streaks after hardening?
- The white streaks (called 'bloom') happen when chocolate isn't properly tempered. To prevent this, you can use the quick tempering method mentioned in the recipe - reserve some chopped chocolate and stir it into the melted chocolate to cool it down slightly. Another option is to use confectionery coating/melting wafers which don't require tempering. While bloom is primarily cosmetic and doesn't affect taste, storing the dipped eggs in the refrigerator can also help minimize it.
- → Can I flavor the marshmallows differently?
- Absolutely! While the recipe calls for vanilla extract, you can substitute other extracts for different flavors. Try almond, coconut, lemon, or even peppermint (use 1/2 to 3/4 the amount for stronger extracts). You can also add a few drops of food coloring to the marshmallow mixture before molding for colorful eggs. For more complex flavors, consider adding a teaspoon of freeze-dried fruit powder or replacing part of the water with strong coffee or fruit juice.