
 Pin
Pin
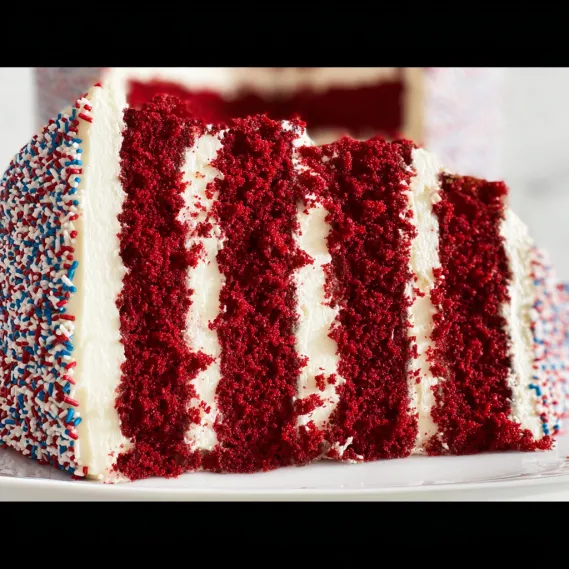
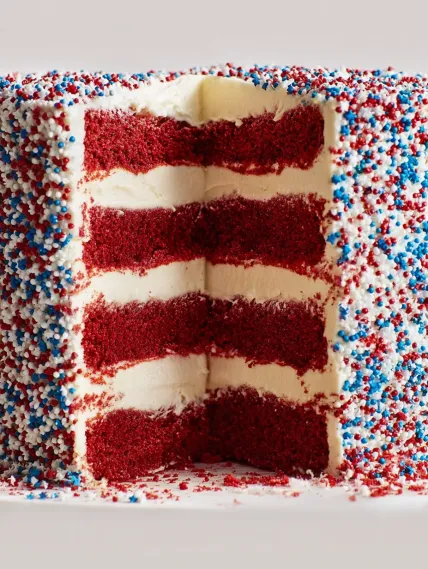
This red velvet fireworks cake transforms any celebration into a spectacular event with its vibrant layers and festive decoration. Perfect for summer gatherings, this showstopper combines the classic tangy-sweet flavor of red velvet with a patriotic twist that will have everyone reaching for seconds.
I first made this cake for a Fourth of July barbecue last year and my guests were absolutely speechless when I cut the first slice. The collective gasps were worth every minute spent in the kitchen. Now it has become my signature dessert for summer celebrations.
Ingredients
- All-purpose flour: Creates the perfect tender crumb structure for this multilayered cake
- Unsweetened cocoa powder: Provides that subtle chocolate undertone authentic to true red velvet
- Buttermilk: Adds tanginess and helps activate the baking soda for proper rise
- Red gel food coloring: Delivers intense color without adding excess liquid to the batter
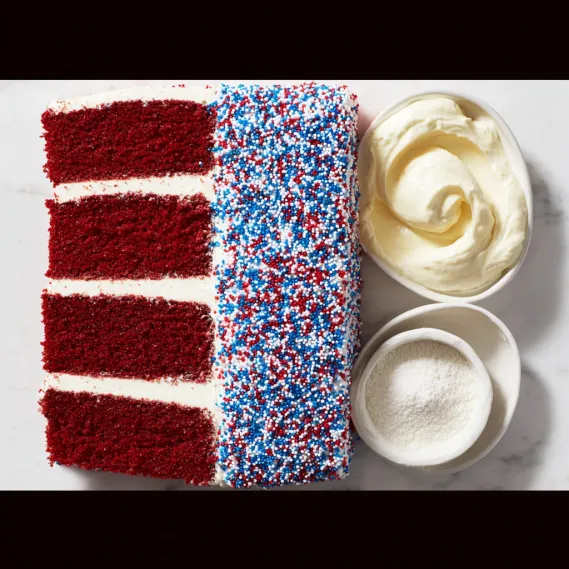
- Cream cheese and butter: Combination makes a frosting that holds its shape but remains silky smooth
- Nonpareils: In patriotic colors transform an ordinary cake into a celebration centerpiece
How To Make Red Velvet Fireworks Cake
- Prepare Your Pans:
- Brush two 9-inch round cake pans with vegetable oil and dust with flour. This preparation ensures your delicate cake layers will release easily without breaking. Take extra care to coat the sides completely.
- Mix The Dry Ingredients:
- Whisk together flour, cocoa powder, baking soda and salt in a medium bowl. This distributes the leavening agents evenly throughout the dry ingredients for consistent rise across all six layers.
- Create The Batter Base:
- Combine granulated sugar, vegetable oil, buttermilk, eggs and vanilla in a large bowl until completely smooth. The oil creates a moist cake while buttermilk provides that distinctive red velvet tang.
- Add The Color:
- Whisk in the red gel food coloring until evenly distributed. Gel coloring is concentrated so you get vibrant red without thinning the batter. The color will deepen slightly during baking.
- Combine Wet And Dry:
- Add the flour mixture to your colored wet ingredients and whisk until completely smooth but do not overmix. Stop as soon as no dry streaks remain to keep your cake tender.
- Bake In Batches:
- Spread exactly 3/4 cup batter in each prepared pan. This precise measurement ensures uniform thickness across all six layers. Bake until a toothpick comes out clean and the tops spring back when touched lightly.
- Cool And Repeat:
- Let the cakes cool briefly in pans before transferring to a cooling rack. Wash, dry and re-prepare your pans for the next batch. Repeat the process twice more until you have six identical thin layers.
- Make The Frosting:
- Beat cream cheese and butter until fluffy and light, then gradually incorporate confectioners sugar. This slow addition prevents sugar clouds and ensures a silky smooth texture without grittiness.
- Assemble The Cake:
- Place one layer on your serving plate and spread with a scant cup of frosting. Stack and frost each layer, then apply a thin crumb coat around the entire cake. This base layer seals in crumbs before final decoration.
- Add The Fireworks:
- Cover the entire cake with colorful nonpareils while the frosting is still slightly soft. Place the cake on a rimmed baking sheet to catch falling sprinkles and press them gently into the sides for maximum coverage.
My favorite part of this recipe is watching people's faces when they see the first slice. My daughter once proclaimed it looked like "cake fireworks" which is how it got its name in our family cookbook. The contrast between the vivid red layers and white frosting, all topped with festive sprinkles, makes this dessert as photogenic as it is delicious.
Make-Ahead Options
This cake actually benefits from being made a day ahead. The flavors deepen and the layers become even more moist as they rest. You can bake all the layers up to two days in advance and store them tightly wrapped in plastic at room temperature. The frosting can be made a day ahead and refrigerated, but bring it to room temperature and beat it briefly before using for spreadability. The fully assembled cake will keep beautifully in the refrigerator for up to three days.
Serving Suggestions
For a truly spectacular presentation, serve this cake on a raised cake stand surrounded by fresh berries. The natural red and blue of strawberries and blueberries complement the patriotic theme perfectly. Cut slices with a warm, sharp knife wiped clean between cuts for the cleanest presentation. This cake pairs wonderfully with coffee, tea, or even a glass of champagne for truly special occasions.
Variation Ideas
While the red, white and blue theme works beautifully for patriotic holidays, you can easily adapt this cake for other occasions. For birthdays, use multicolored rainbow nonpareils. For Christmas, stick with the red velvet but use green and red sprinkles. For a more elegant version, replace the nonpareils with white chocolate curls or pearl sprinkles for weddings or anniversaries. The basic structure of thin, vibrant layers remains a showstopper regardless of decoration.
Recipe FAQs
- → How do I get perfectly even cake layers?
Use a kitchen scale to evenly distribute the batter across the pans, and bake each layer until the center springs back when pressed.
- → Why is buttermilk used in this cake?
Buttermilk adds a slight tangy flavor and helps create a moist, tender texture in the cake layers.
- → Can I use liquid food coloring instead of gel?
Gel food coloring is recommended for vibrant red color without altering the batter consistency. Liquid may require more and can affect the texture.
- → How do I prevent cake layers from sticking to the pans?
Brush the pans with vegetable oil, dust with flour, and tap out excess before adding the batter.
- → Can I make the cake ahead of time?
Yes, you can bake the layers a day in advance. Wrap them tightly in plastic wrap and store at room temperature until ready to frost.
- → How can I neatly apply the nonpareils?
Place the frosted cake on a rimmed baking sheet, sprinkle the nonpareils over, and press gently to adhere. Reuse any fallen sprinkles from the sheet.