
 Pin
Pin
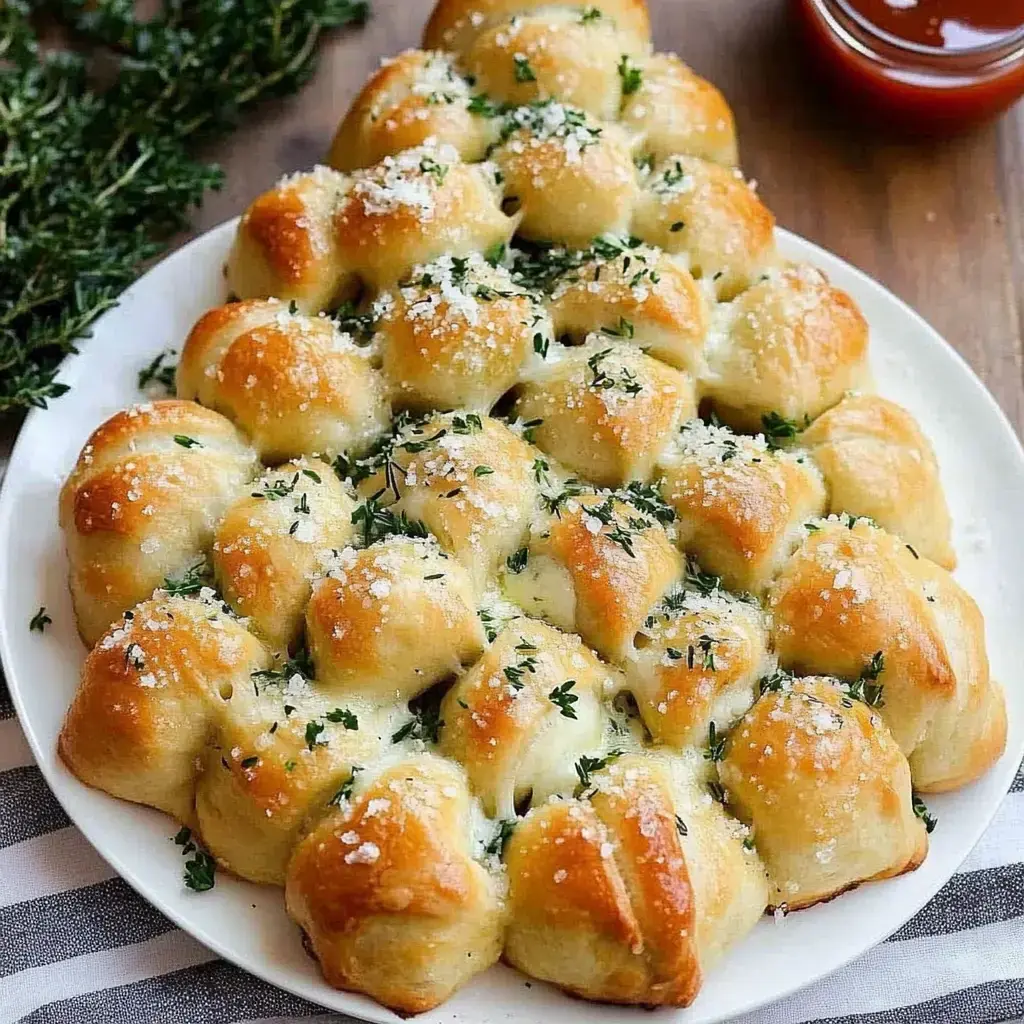
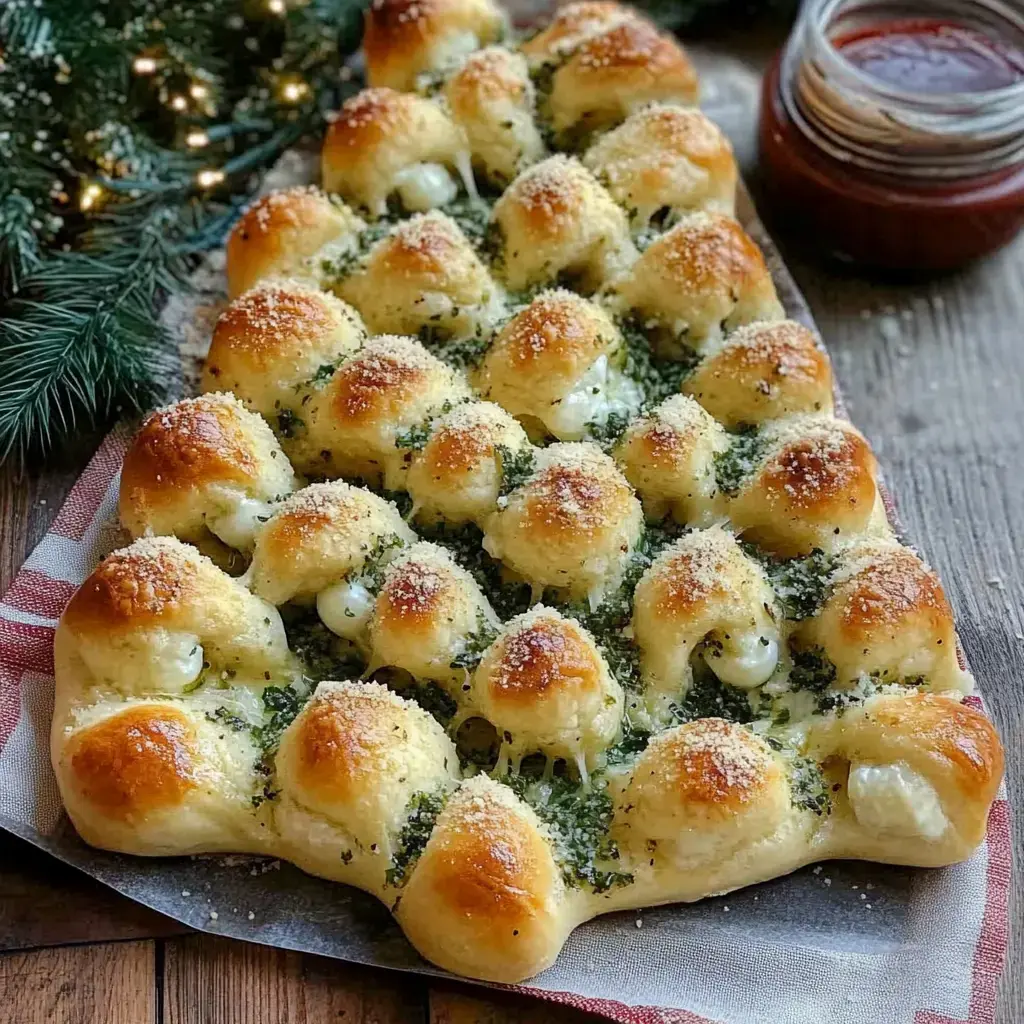
Want to impress your holiday crowd with something truly eye-catching? This Gooey Christmas Tree Bread isn't just tasty - it's a total conversation starter! Imagine soft, puffy bread formed into a festive tree shape, packed with melty mozzarella and sprinkled with fresh herbs. The coolest part? We're using ready-made pizza dough, so you'll spend more time enjoying the party and less time cooking!
What Makes This Bread Extra Special
Need that standout appetizer everyone will remember? You've found it! Not only does it look incredible (an actual Christmas tree you can eat!), but who'd turn down warm bread filled with cheese? And guess what - it's much simpler than it appears! We won't tell if you don't! Whether you're throwing a dinner party or bringing something to a holiday gathering, this bread will definitely steal the show.
Ingredients List
- Pizza Dough: 2 cans from the refrigerated section - your time-saving friend!
- Mozzarella Sticks: 6-8 sticks, diced into pieces
- Butter: 1/4 cup, melted to perfection
- Parmesan: 1/2 cup freshly grated - skip the pre-packaged stuff
- Fresh Herbs: Small bunch each of parsley, rosemary, and basil
- Garlic: 2-3 cloves, chopped super fine
- Egg: 1 large, for that beautiful brown finish
- Dipping Sauces: Marinara or pesto (whatever you like best!)
- Parchment Paper: For easy cleanup
How To Make Christmas Tree Bread
- Prep Your Kitchen
- Heat your oven to 400°F and put parchment on your largest baking sheet. This will be where our festive tree takes shape! While waiting, cut those mozzarella sticks into smaller chunks.
- Create Your Cheese Pockets
- Open the pizza dough and slice it into about 30 even squares. Place a piece of cheese in the center of each square, then close the edges tightly - you don't want cheese leaking out during baking! Roll them into smooth balls.
- Arrange Your Tree Shape
- Now for the fun part! Place those balls on your baking sheet in a triangle pattern. Start with just one ball at the top, then rows of two, three, and so on as you work downward. Make sure they're touching each other - that's what makes it pull-apart style!
- Get That Golden Look
- Mix the egg with a tiny bit of water and brush it over all the dough balls. This gives us that beautiful brown color everyone loves. Be thorough - cover every part!
- Let It Bake
- Stick your creation in the oven for around 16-18 minutes. You want the top nicely browned and the cheese melted inside. Your house will smell amazing!
- Add Final Flavors
- While baking, combine your melted butter with those fresh herbs, garlic, and half the Parmesan. When the bread comes out hot, brush this mixture all over. Scatter the remaining Parmesan on top while everything's still warm.
The Crowd-Pleasing Factor
This isn't ordinary bread - it's a whole event! When you bring out a Christmas tree people can actually eat, you'll see their faces light up! There's something so satisfying about everyone reaching in, pulling off pieces, and finding those pockets of melted cheese hidden inside.
Nailing The Technique
The key to success here is sealing those cheese pockets properly. You've gotta close those dough balls really tight - nobody wants to lose that gooey goodness! And don't rush past the herb butter finish - that's what transforms this from good to "I need your recipe right now" amazing.
Foolproof Tree Shaping
Try building your tree starting at the pointy top and working down - first one ball, then a row of two, then three, and keep going. Don't stress if it's not absolutely perfect; once it's baked and that herby butter goes on, it'll look fantastic. Just remember the balls need to touch each other - that's what makes pulling it apart so fun!
Creating Those Cheese Stretches
Want those social media-worthy stretchy cheese moments? Here's a little secret: let the bread sit for about 5 minutes after taking it out. The cheese will stay perfectly melty but won't be so hot that it runs everywhere. It's just right for those drool-worthy food photos!
Presentation Ideas
Bring this beauty to the table while it's still warm, surrounded by small dishes of marinara and pesto for dipping. You'll see how quickly everyone gathers around! And here's a smart trick: keep those dipping sauces slightly warm too - it makes the whole experience ten times better.
Summary
Love this? Try cheese knots next. Or make garlic roll ups. Both great for sharing.
Recipe FAQs
- → Need different dough?
Roll dough works. Soft kind's best. Fresh better though. Watch bake time. Still pulls good.
- → Mix cheese kinds?
Any melty works. Mix them up. Sharp adds kick. Fresh grated best. Don't use dry kind.
- → Keeping leftovers?
Box it up tight. Two days cold max. Warm in oven. Gets crisp again. Fresh is better.
- → Make it early?
Shape it ahead. Keep cold wrapped. Bake just before. Worth fresh heat. Smells so good.
- → Want more spicy?
Red pepper works. Hot sauce maybe. Spice the butter. Start small though. Can't take out.
- → Getting too brown?
Cover with foil. Lower heat bit. Move pan down. Check early. Watch it close.
- → Taking it places?
Best right there. Bake when there. Bring stuff ready. Worth hot serve. Take backup snack.
- → Need it faster?
Ready dough helps. Quick cheese cut. One pan works. Still needs bake time. Worth short wait.
- → Making big tree?
Double works fine. Need bigger pan. More bake time. Watch middle done. Space helps lots.
- → Want more flavor?
More herbs good. Fresh garlic best. Try pesto mix. Even ranch works. Don't hide cheese.
- → Not pulling apart?
Cut more deep. Space bits good. Less cheese maybe. Watch how pack. Still tastes fine.
- → Cheese not melty?
More time helps. Check temp good. Fresh cheese best. Keep it covered. Worth the wait.