
 Pin
Pin
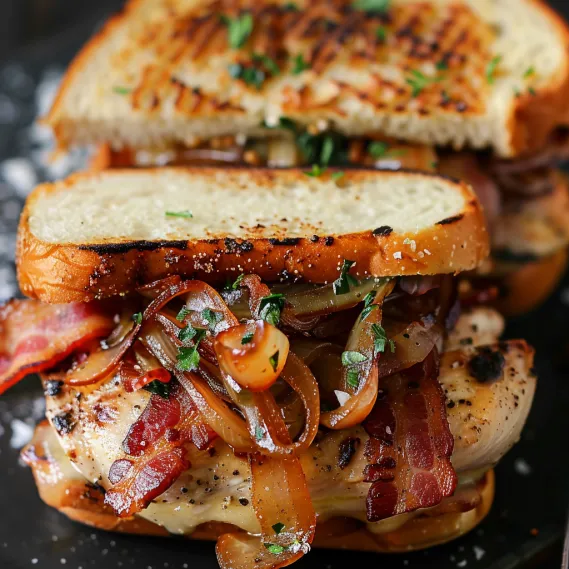
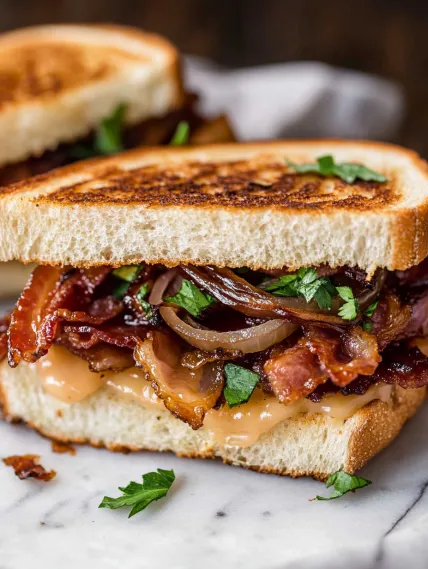
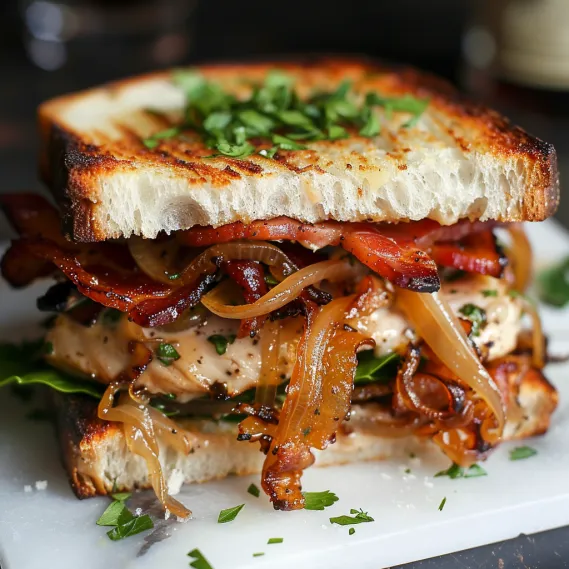
There's something deeply satisfying about the perfect bacon sandwich - that magical combination of crispy, savory bacon nestled against sweet, meltingly tender caramelized onions between slices of toasted bread. This isn't just any sandwich; it's the ultimate comfort food that transforms a handful of simple ingredients into something truly extraordinary. Each component plays its essential role - the bacon delivering smoky richness, the onions providing sweet depth, and the bread offering the perfect canvas to bring it all together in one harmonious bite.
Last weekend, I made these sandwiches for my family's Sunday brunch. My husband, who typically rushes through meals, actually stopped mid-bite to comment on how the sweetness of the onions completely transformed what could have been an ordinary bacon sandwich. My teenage son, who normally picks apart sandwiches to eat components separately, devoured his in record time and immediately asked for another.
Essential Ingredients and Selection Tips
- Bacon: Choose thick-cut bacon for the best texture and flavor impact. Look for bacon with a good balance of fat and meat - the fat renders down during cooking to create those deliciously crispy edges. I prefer applewood or hickory smoked varieties for an extra dimension of flavor
- Onions: Yellow onions work beautifully for caramelizing, as they have the perfect balance of natural sugars. Make sure they're firm and heavy for their size with no soft spots. Slice them thinly and uniformly to ensure they cook evenly during the caramelization process
- Bread: Select a sturdy bread that can stand up to the fillings - sourdough is my personal favorite for its slight tang and structural integrity. A good-quality white sandwich bread or whole grain option works well too, depending on your preference
- Butter and Olive Oil: Using a combination creates the perfect environment for caramelizing onions - the butter adds rich flavor while the olive oil prevents burning during the long cooking process
When shopping for these ingredients, quality truly matters. The first time I splurged on locally sourced thick-cut bacon from a specialty butcher, the difference in flavor was remarkable - less water content meant better crisping and more concentrated bacon flavor.
Detailed Cooking Instructions
- Step 1: Caramelize the Onions to Perfection
- Heat olive oil and butter in a large skillet over medium-low heat until the butter melts completely. Add thinly sliced onions and a pinch of salt, then cook slowly for 25-30 minutes, stirring occasionally to prevent burning. The key here is patience - rushing this step will give you sautéed onions, not the deeply sweet, jam-like caramelized onions that make this sandwich special. You'll know they're done when they've reduced significantly in volume and turned a rich golden brown color.
- Step 2: Cook the Bacon to Your Ideal Crispness
- While the onions are working their magic, arrange bacon slices in a single layer in a cold skillet. Start with a cold pan and heat gradually to medium - this allows the fat to render slowly, resulting in evenly cooked, perfectly crisp bacon. Turn occasionally until the bacon reaches your preferred level of crispness, about 8-10 minutes. Transfer to paper towels to drain excess grease, but don't discard those delicious drippings if you want to elevate your sandwich further.
- Step 3: Prepare the Bread with Care
- Lightly toast your bread slices to provide structure for the fillings. For an indulgent twist, brush one side of each bread slice with some of the reserved bacon fat before toasting - this adds another layer of flavor that takes the sandwich to new heights. The bread should be golden and crisp on the outside but still tender inside to provide the perfect contrast to the fillings.
- Step 4: Assemble with Thoughtful Layering
- Spread your chosen condiment on the inside of both bread slices - a good quality mayonnaise creates a moisture barrier that prevents sogginess. Layer the caramelized onions on the bottom slice, followed by the bacon arranged in an even layer. If adding optional ingredients like lettuce or tomato, place them between the onions and bacon to keep the crisp elements from getting soggy from direct contact with the onions.
- Step 5: Serve at the Perfect Temperature
- Complete the sandwich by adding the top slice of bread and cutting diagonally for the most appealing presentation. Serve immediately while the bacon is still warm and crisp, the onions are hot and fragrant, and the bread maintains its toasty character. This timing ensures you experience the full range of temperatures and textures that make this sandwich extraordinary.
The first time I made this sandwich, I tried to speed up the onions by raising the heat, resulting in partially burnt, partially undercooked onions. I've since learned that maintaining that medium-low temperature and exercising patience is absolutely worth the wait. Those perfectly caramelized onions transform what could be an ordinary bacon sandwich into something truly memorable.
Serving Inspiration
Transform this bacon sandwich into a complete meal by pairing it with complementary sides. On chilly days, I serve it alongside a bowl of creamy tomato soup for the ultimate comfort food combination - the acidity of the soup cuts through the richness of the sandwich perfectly. For a lighter option, a simple arugula salad with lemon vinaigrette provides a peppery, refreshing counterpoint to the sandwich's savory depth. When entertaining for brunch, I cut the sandwiches into quarters and serve them as substantial finger food alongside a selection of fresh fruit.
Creative Variations
While the classic version is hard to beat, I've developed several variations that offer delicious alternatives. Adding a fried egg with a slightly runny yolk creates a breakfast version that's absolutely decadent - the yolk creates a natural sauce that enhances both the bacon and onions. For a more substantial lunch option, I sometimes add sliced avocado and a layer of good quality cheddar cheese that melts slightly from the heat of the freshly cooked components. The creamy avocado and sharp cheese complement the bacon and onions beautifully.
Preparation Efficiencies
To streamline preparation, especially when serving a crowd, I often make a large batch of caramelized onions in advance. They keep beautifully in the refrigerator for up to a week and can be gently reheated when needed. This advance preparation turns what might be a time-consuming sandwich into something you can assemble in minutes. The caramelized onions actually improve after a day or two as the flavors continue to develop and meld.

What I love most about this seemingly simple sandwich is how it showcases the magic that happens when quality ingredients are treated with care and attention. The transformation of raw onions into sweet, jammy threads through the alchemy of slow cooking, paired with perfectly crisp bacon between slices of toasted bread, creates something far greater than the sum of its parts. It reminds me that sometimes the most satisfying foods aren't the most complex or expensive - they're the ones made with understanding and respect for each ingredient's potential.
Recipe FAQs
- → Can I use chicken thighs instead of chicken breasts?
- Yes, boneless skinless chicken thighs work beautifully in this recipe and often result in even juicier meat. There's no need to pound them thin, but you'll still want to dredge them in flour before searing. The cooking time might be slightly longer for thighs - cook until they reach an internal temperature of 165°F.
- → What can I substitute for the white wine?
- If you prefer not to use wine, you can substitute with additional chicken broth and add 1 tablespoon of white wine vinegar or lemon juice to maintain the acidic component. This will preserve the flavor profile while making the dish alcohol-free.
- → Can I use frozen spinach instead of fresh?
- Yes, you can use frozen spinach in a pinch. Thaw completely and squeeze out all excess moisture before adding to the sauce. Use about 1 cup of thawed and squeezed frozen spinach to replace the 3 cups of fresh spinach called for in the recipe.
- → What sides pair well with Spinach Chicken?
- This dish pairs wonderfully with pasta (especially fettuccine or linguine), mashed potatoes, or rice to soak up the delicious sauce. For a lighter option, serve with roasted vegetables, a simple green salad, or cauliflower rice. Garlic bread or crusty French bread also makes an excellent accompaniment for sauce-dipping.
- → How can I make this recipe lighter or lower in calories?
- To make a lighter version, you can substitute the half and half with whole milk or even evaporated milk. Reduce the amount of butter to 1-2 tablespoons, and use light cream cheese. You can also increase the amount of spinach for more vegetables and nutrition. The sauce won't be quite as rich but will still be delicious.
- → Can I make this recipe ahead of time?
- While it's best served fresh, you can prepare components ahead of time. Pound and season the chicken, then refrigerate up to a day ahead. You can also make the sauce and store separately, then reheat gently on the stove before adding the chicken to finish. If reheating the complete dish, do so gently over low heat with a splash of chicken broth to prevent the sauce from breaking.