
 Pin
Pin
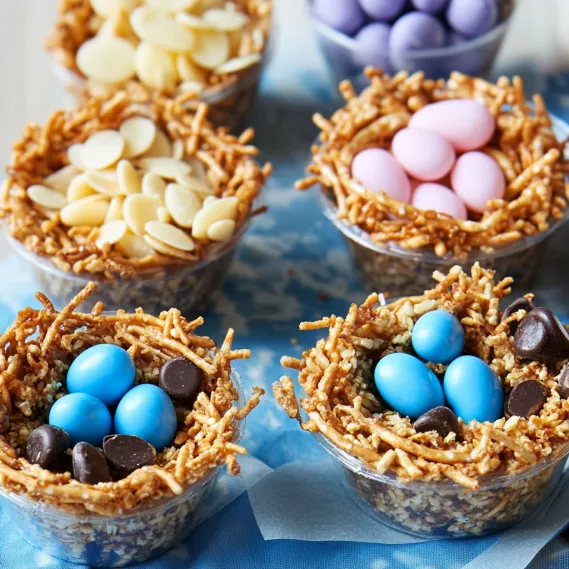
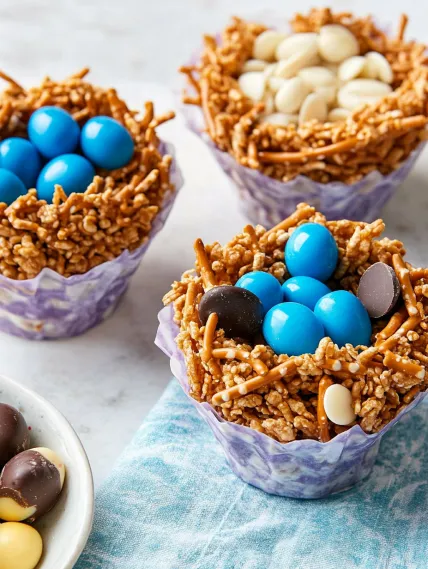
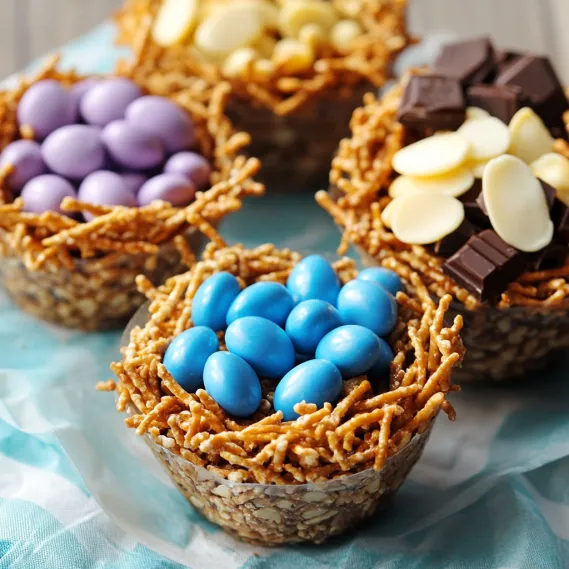
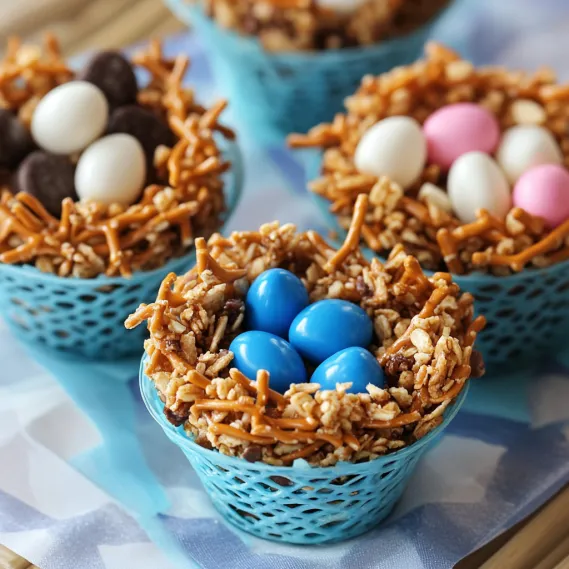
These edible Easter nest eggs transform simple pantry ingredients into charming, festive treats that capture the spirit of spring. With just a few minutes of work, you can create realistic-looking bird's nests complete with colorful "egg" candies nestled inside. The brilliant simplicity of these treats lies in their versatility – choose from four different base combinations to match your taste preferences or what you have on hand. Whether made with butterscotch and shredded wheat for a golden, textured appearance, dark chocolate and pretzels for a sweet-salty twist, chocolate and crispy rice for a classic treat, or white chocolate and coconut for a snow-white nest, each variation creates a delightful spring centerpiece that's as fun to make as it is to eat.
I first made these edible nests when looking for a quick Easter treat that wouldn't require baking. What surprised me most was how realistic they looked once finished – the shredded wheat version especially captures the twiggy texture of a real bird's nest. The first time I served these at our family Easter gathering, everyone was charmed by their appearance and delighted by their taste. Now they've become an annual tradition, with family members requesting their favorite variations year after year.
Essential Ingredients and Selection Tips
- Chocolate Chips: The binding agent that holds your nests together. Choose quality chips that melt smoothly.
- Butterscotch Chips: Creates golden nests that look remarkably like real straw. Select brands without artificial colors for the most natural appearance.
- Shredded Wheat: Provides the most realistic nest-like texture. Crush it just enough to create "twigs" without turning it to powder.
- Pretzel Sticks: Offers a delicious sweet-salty combination. Break them into varied lengths for the most natural look.
- Crispy Rice Cereal: Creates a delicate, light texture perfect for smaller nests. Use fresh cereal for maximum crispness.
I've found that using a mix of candy "eggs" creates the most realistic and appealing presentation. I like to combine pastel candy-coated chocolate eggs in various sizes with a few speckled candy eggs for that authentic robin's egg appearance. The contrast in sizes and patterns mimics what you'd find in nature.
Detailed Cooking Instructions
- Step 1:
- Line a 6-cup muffin tin with plastic wrap, pressing it into each cup and leaving overhang for easy removal. Arrange your chosen nest ingredients (cereal, pretzels, coconut, or shredded wheat) in separate bowls along with your selected chips. Have your candy "eggs" ready for filling the nests once they're formed and set.
- Step 2:
- Place 1 cup of your chosen chips (dark, milk, white chocolate, or butterscotch) in a microwave-safe bowl. Heat in 30-second intervals at 50% power, stirring between each interval until completely smooth. Be careful not to overheat, which can cause the chocolate to seize and become unusable. The melted chocolate should be glossy and flow easily from your spoon.
- Step 3:
- For butterscotch nests, stir ¾ cup crushed shredded wheat and ¾ cup sliced almonds into melted butterscotch chips. For pretzel nests, combine 2½ cups broken pretzel sticks with melted dark chocolate. For cereal nests, mix 1½ cups crispy rice cereal with melted milk or white chocolate. For coconut nests, fold 1½ cups toasted coconut flakes into melted white chocolate. Mix gently but thoroughly until all dry ingredients are evenly coated.
- Step 4:
- Working quickly before the chocolate sets, divide your mixture evenly among the prepared muffin cups. Using the back of a spoon, press the mixture up the sides of each cup, creating a well in the center that mimics a bird's nest. The thickness should be even throughout, with a well-defined hollow for holding the candy eggs. The nests should look rustic and natural, not perfectly symmetrical.
- Step 5:
- Place the muffin tin in the refrigerator until the nests are completely firm, about 10 minutes. Once set, carefully remove each nest by lifting out with the plastic wrap. Fill each nest with a selection of egg-shaped candies, arranging them to look naturally placed. For the finishing touch, add a piece of green candy or a small sprig of fresh mint to represent grass or leaves.
The first time I made these, I skipped the plastic wrap lining and spent frustrating minutes trying to pry the hardened nests out of the muffin tin. Now I never skip this simple step that makes removal effortless and preserves the perfect nest shape.
Customizing For Different Occasions
While these nests are perfect for Easter, I've discovered they're versatile enough to adapt for various celebrations throughout the year. For spring birthday parties, I fill them with the birthday child's favorite candies and top each with a small candle. For baby showers, I create all-blue or all-pink nests using colored white chocolate and fill them with color-coordinated candies. During Christmas, I add a touch of peppermint extract to the chocolate and fill the nests with red and green candies for festive holiday treats. My sister-in-law even used a variation of these as wedding favors, creating elegant nests with gold-dusted chocolate eggs inside. The basic technique remains the same – it's just the colors and fillings that change with the occasion.
Kid-Friendly Crafting Tips
These edible nests have become one of my favorite activities to do with children during Easter season. I've learned a few tricks to make this a successful and enjoyable experience for all ages. For younger children (3-5), I pre-measure ingredients into small bowls and let them help with stirring and filling the nests with candies. School-aged children (6-10) can help break pretzel sticks, crush shredded wheat, and form the nests while supervised. Tweens and teens can handle the entire process, including melting the chocolate with minimal supervision. To avoid the disappointment of broken nests, I always make a few extra "just in case." And I've found that covering the work surface with parchment paper makes cleanup much easier when little hands are involved.
Creative Flavor Combinations
After years of making these nests, I've developed some favorite flavor combinations that elevate them from cute to crave-worthy. For the butterscotch shredded wheat nests, try adding a pinch of cinnamon and a handful of toffee bits for a warm, caramel flavor. The dark chocolate pretzel nests become exceptional with a sprinkle of sea salt and a few crushed coffee beans mixed in. White chocolate coconut nests take on a tropical flavor with the addition of finely chopped dried pineapple and a drop of coconut extract. For chocolate cereal nests, a tablespoon of peanut butter stirred into the melted chocolate creates a nostalgic peanut butter cup flavor that both kids and adults love. These simple additions transform the basic recipe into something truly special that guests will request year after year.
Presentation Ideas For Maximum Impact
While these nests are charming individually, I've found that the way you present them can make a significant impact on your Easter table. For family gatherings, I arrange them on a bed of green paper "grass" in a shallow basket for a festive centerpiece. For more elegant occasions, I place each nest on a small square of parchment paper on a tiered dessert stand, alternating the different varieties for visual interest. When giving them as gifts, I nestle individual nests in small cellophane bags tied with raffia or ribbon. Last Easter, I created a "nest builder's workshop" where guests could assemble their own nests from prepared ingredients – it was a huge hit with both children and adults, and took the pressure off having to prepare dozens of nests ahead of time.
These Easter nest eggs have become more than just a seasonal treat in our home – they're a beloved tradition that marks the beginning of spring. The simplicity of the recipe allows even the youngest family members to participate in their creation, while the impressive results delight guests of all ages. There's something magical about transforming ordinary pantry ingredients into these charming miniature nests that brings a touch of nature's renewal to our Easter celebrations.
Recipe FAQs
- → Can I make these Easter nests ahead of time?
- Yes! These chocolate nests can be made 2-3 days ahead of time. After they've set, store them in an airtight container at room temperature if your house isn't too warm. If your home is warm, store them in the refrigerator and bring to room temperature before serving. Add the candy eggs just before serving or gifting for the freshest presentation.
- → What's the best way to melt the chocolate chips?
- For best results, melt the chocolate chips in the microwave in 30-second intervals at 50% power, stirring between each interval until smooth. Be careful not to overheat, as chocolate can burn easily. Alternatively, you can use a double boiler method by placing the chips in a heat-safe bowl over a pot of simmering (not boiling) water, making sure the bowl doesn't touch the water.
- → How do I toast coconut for the coconut nests?
- To toast coconut flakes, spread them in an even layer on a baking sheet and bake at 325°F for 5-10 minutes, stirring every few minutes until golden brown. Watch carefully as coconut can burn quickly! Alternatively, you can toast coconut in a dry skillet over medium-low heat, stirring constantly until golden brown. Let cool completely before mixing with the melted chocolate.
- → Can I use different types of chocolate than what's suggested?
- Absolutely! Feel free to swap the chocolate types between variations based on your preference. For example, you could use milk chocolate with pretzels or dark chocolate with coconut. White chocolate works well with any of the mix-ins, and you can even use colored candy melts for more vibrant nests.
- → What candies work best for filling the nests?
- Traditional choices include mini chocolate eggs, jelly beans, or pastel-colored M&M's. For a more realistic look, blue or speckled candy eggs work well. You can also use small chocolate bunnies, Peeps marshmallow chicks, or even colorful jordan almonds. Choose candies that are the right size to fit in your nests without overwhelming them.
- → Can I make these nests without a muffin tin?
- Yes! If you don't have a muffin tin, you can shape the nests freeform on a baking sheet lined with parchment paper or wax paper. Simply drop spoonfuls of the mixture onto the paper, then use the back of a spoon or your thumb to create an indentation in the center. They won't be as uniform as muffin tin nests, but they'll still be charming and delicious.