
 Pin
Pin
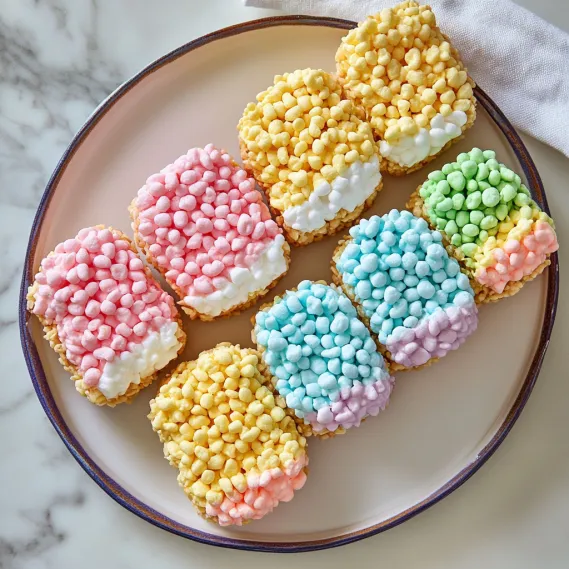
These colorful Easter Egg Cereal Treats reinvent the classic rice cereal treats into a festive spring dessert that's as fun to make as it is to eat. Layers of vibrant, marshmallow-coated cereal create a stunning loaf that, when sliced and cut with an egg-shaped cookie cutter, reveals beautiful striped eggs that will brighten any Easter dessert table. The combination of chewy marshmallow, crispy cereal, and playful colors makes these treats irresistible to both kids and adults alike. Best of all, they require no actual baking, making them a perfect project to create with little helpers.
I first made these treats for my daughter's spring school party, and they were such a hit that they've become an annual tradition in our home. What surprised me most was how the children's eyes lit up when they saw the colorful layered pattern inside each egg – something about the rainbow effect made these simple cereal treats feel magical. Even my husband, who rarely gets excited about desserts, commented on how clever and appealing they looked on our Easter dessert table.
Essential Ingredients and Selection Tips
- Mini Marshmallows: Use fresh, soft marshmallows for the best melting properties. Mini marshmallows melt more quickly and evenly than large ones.
- Salted Butter: The salt balances the sweetness perfectly. If you only have unsalted, add a small pinch of salt to each batch.
- Crispy Rice Cereal: The original brand works best due to its consistent shape and crispness, but any rice cereal will do. Make sure it's fresh for maximum crunch.
- Food Coloring: Gel food coloring provides the most vibrant colors without adding excess liquid that could make the mixture too soft.
- Cooking Spray: Essential for preventing sticking when working with the marshmallow mixture. A neutral flavor like canola works best.
I've found that making sure your marshmallows are fresh makes a huge difference in these treats. Once I tried making them with a bag that had been in my pantry for months, and the mixture was much more difficult to work with and didn't hold together as well. Fresh marshmallows melt beautifully and create the perfect chewy texture.
Detailed Cooking Instructions
- Step 1: Prepare Your Pan Properly
- Coat a 9-by-5-inch loaf pan thoroughly with cooking spray, ensuring all corners are covered. Then line with two strips of parchment paper, positioning them perpendicular to each other with overhang on all sides. Spray the parchment again with cooking spray. This double preparation ensures your layered treat will release perfectly without sticking.
- Step 2: Create Your First Vibrant Layer
- In a medium microwave-safe bowl, combine 1½ cups mini marshmallows with 1 tablespoon butter. Microwave until marshmallows puff and butter melts, about 1 minute. Stir until completely smooth, microwaving 30 more seconds if needed. Add your first food coloring choice and stir until evenly tinted. Quickly fold in 1½ cups crispy rice cereal until fully coated.
- Step 3: Form Perfect Even Layers
- Spray your hands or a rubber spatula with cooking spray to prevent sticking. Press the colored mixture firmly into the bottom of the prepared loaf pan, creating an even layer. Work quickly as the mixture sets fast. Repeat the entire process three more times with different food colors, pressing each new layer firmly on top of the previous one.
- Step 4: Chill For Clean Cutting
- Once all four colored layers are in place, press down firmly across the entire surface to compact the layers together. Refrigerate the loaf until very firm, about 20 minutes. This chilling step is crucial for clean slicing and ensures your eggs will maintain their beautiful layered pattern when cut.
- Step 5: Transform Into Easter Eggs
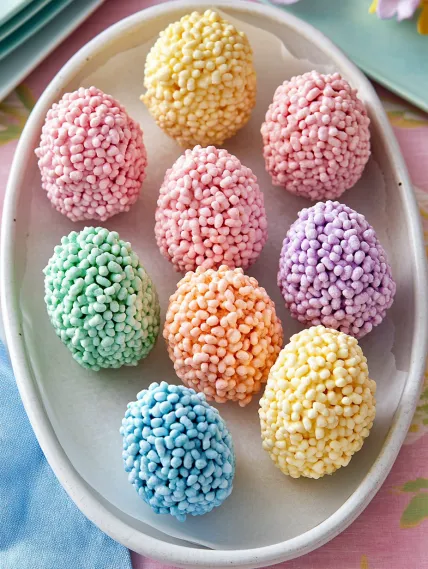
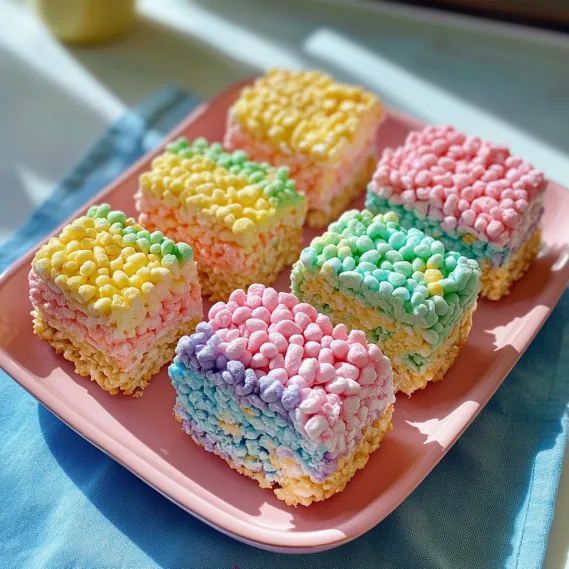
- Using the parchment overhang, lift the cereal treat loaf out of the pan and remove the parchment paper. With a sharp knife, cut the loaf crosswise into ¾ to 1-inch-thick slices. Then, using a 3 to 4-inch egg-shaped cookie cutter, cut one egg diagonally from each slice to reveal the colorful striped pattern inside.
The first time I made these, I didn't chill the loaf long enough before cutting, and the layers compressed and stuck to my knife. Now I know that patience during the chilling step is essential for those picture-perfect eggs with clean, defined color layers.
Choosing Your Color Palette
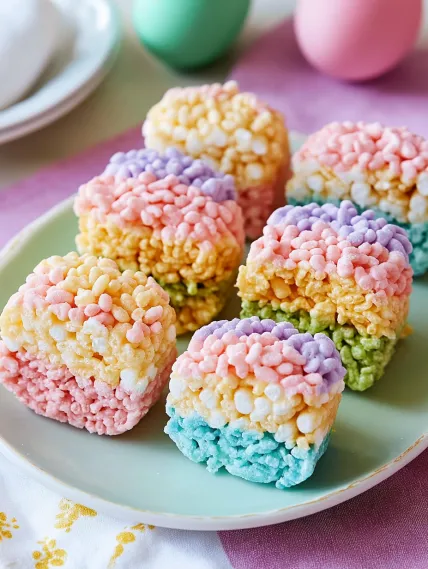
The beauty of these Easter egg treats lies in their vibrant colors, and selecting a cohesive color palette elevates them from cute to stunning. I've experimented with several color combinations over the years and found that traditional Easter pastels (light pink, sky blue, pale yellow, and mint green) create a classic spring look. For a more vibrant option, try rainbow brights (red, yellow, green, and blue) that pop against a white tablecloth. My personal favorite combination uses ombré shades of a single color – for example, four graduated shades of pink from light to dark – which creates a sophisticated, modern look. Whatever palette you choose, arrange your colors strategically – I've found that alternating light and dark colors creates the most striking visual contrast in the finished eggs.
Creative Serving Suggestions
These colorful treats deserve a presentation that showcases their beauty. I love arranging them in a natural Easter "nest" made from shredded wheat cereal or edible Easter grass on a pretty platter. For individual servings at a seated dinner, place one egg on each dessert plate with a small bunch of fresh spring flowers. At children's parties, I've served these alongside cups of pastel-colored yogurt for dipping, which adds another layer of flavor and fun. If you're including these in Easter baskets, wrap each egg individually in clear cellophane tied with ribbon for a bakery-worthy presentation that keeps them fresh and makes them easy to handle.
Make-Ahead And Storage Tips
One of the aspects I appreciate most about these treats is how well they can be prepared in advance of holiday gatherings. I've found they stay fresh and chewy in an airtight container at room temperature for up to three days. For the best texture, avoid refrigerating them after they're cut, as this can make them harder than ideal. If you need to make them more than three days ahead, you can freeze the uncut loaf wrapped tightly in plastic wrap and aluminum foil for up to two weeks. Thaw at room temperature for about two hours before slicing and cutting into eggs. I've also discovered that any scraps from cutting out the eggs can be pressed together and shaped into colorful "Easter bark" – a zero-waste bonus treat that's always the first to disappear!
Fun Variations To Try
While the basic recipe creates beautiful striped eggs, I've developed several variations that offer different visual effects. For a speckled egg look, fold different colored sprinkles into white-tinted cereal mixture. To create marbled eggs instead of striped ones, partially mix different colored batches together before pressing into the pan. For a glamorous touch at adult gatherings, I've added edible gold or silver luster dust to the outside edges of the finished eggs. My children's favorite variation involves using fruit-flavored rice cereal to add another dimension of flavor – the strawberry version paired with pink food coloring creates especially vibrant results both visually and taste-wise.
These Easter Egg Cereal Treats have become one of our most cherished holiday traditions – not just because they're delicious and beautiful, but because making them together creates wonderful family memories. There's something magical about transforming simple ingredients into something so festive and impressive. The delight on everyone's faces when they see the colorful striped pattern inside each egg makes the sticky fingers and kitchen cleanup completely worthwhile!
Recipe FAQs
- → Can I make these Easter egg cereal treats ahead of time?
- Yes! You can make these treats 1-2 days ahead of time. After cutting them into egg shapes, store them in an airtight container at room temperature with parchment paper between layers to prevent sticking. For best freshness, don't make them more than 2 days in advance, as cereal treats tend to get harder over time.
- → What if I don't have an egg-shaped cookie cutter?
- If you don't have an egg-shaped cookie cutter, you can create a template by drawing an egg shape on cardboard or heavy paper, cutting it out, and using it as a guide to cut around with a sharp knife. Alternatively, you can simply cut the loaf into rectangular slices for layered rectangular treats instead of egg shapes.
- → Can I use natural food coloring instead of artificial colors?
- Yes, you can use natural food coloring, but keep in mind that the colors may be more muted than artificial colors. You'll also need to use more natural coloring to achieve vibrant hues. Look for plant-based food colorings made from vegetables and fruits for a natural alternative.
- → How do I prevent the cereal mixture from sticking to my hands when pressing it into the pan?
- Spray your hands generously with cooking spray or coat them with a thin layer of butter before handling the marshmallow mixture. You can also use a piece of wax paper or parchment paper between your hands and the mixture when pressing it into the pan. A silicone spatula sprayed with cooking spray also works well.
- → What can I do with the scraps after cutting out the egg shapes?
- Don't throw away the cereal treat scraps! You can press them together to form small balls or shapes for a chef's treat. Or break them into chunks and use them as an ice cream topping, fold them into cookie dough, or use them as a colorful garnish for other desserts like cupcakes or brownies.
- → Can I use different cereals instead of rice cereal?
- Yes, you can experiment with other cereals! Corn flakes, Cheerios, Chex, or Fruity Pebbles all work well in marshmallow treats. Just make sure to use 1½ cups of whatever cereal you choose for each colored layer. Using Fruity Pebbles or other colorful cereals will add extra color to your layers for an even more festive look.