
 Pin
Pin
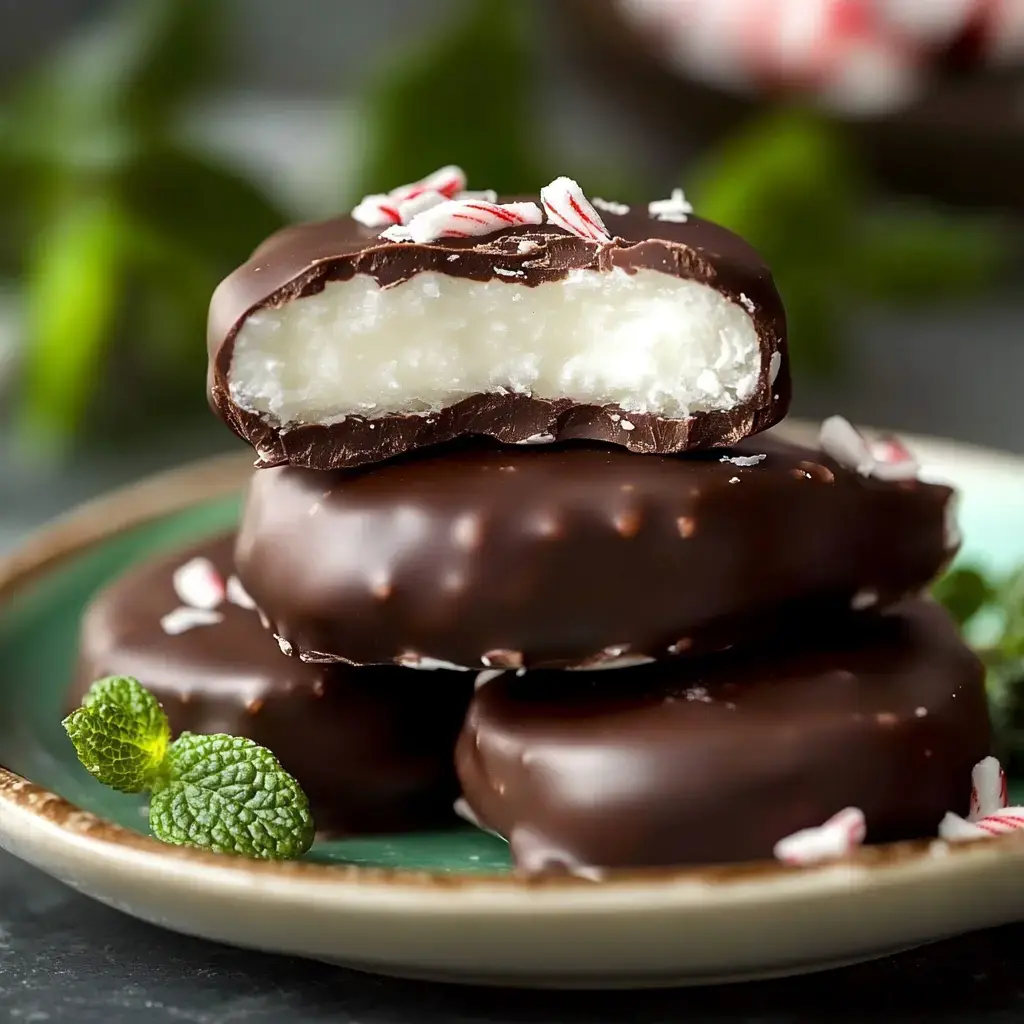
Want to whip up some incredible homemade peppermint patties? These tiny morsels of minty chocolate goodness are way simpler to create than you might think! Whether you've got a hankering for that mint-chocolate pairing or need a perfect gift for someone special, this guide will walk you through making these tempting treats right in your own kitchen.
Benefits of Homemade Versions
Have you ever munched on a peppermint patty and wondered if you could make them yourself? Now's your chance! These DIY treats aren't just yummy - they're actually enjoyable to prepare. There's also something really heartwarming about giving someone candies you've made from scratch. Believe me, once you figure out how to create these cool, minty goodies, store-bought ones won't cut it anymore.
Required Ingredients
- Sifted Powdered Sugar: 4 cups to create those velvety sweet centers
- Evaporated Milk: 3 tablespoons for silky smoothness
- Light Corn Syrup: 3 tablespoons to bind everything nicely
- Softened Coconut Oil: 2 tablespoons
- Peppermint Oil: 1/4 teaspoon (swap for 1 teaspoon extract if needed)
- Good Quality Dark Chocolate: 12 ounces for coating
- Crushed Candy Canes: 2-3 for garnish (if you want)
How To Make Delightful Peppermint Patties
- Create Your Filling
- Combine powdered sugar, milk, corn syrup, coconut oil, and peppermint until it feels doughy. Add more powdered sugar if it seems too sticky.
- Form Into Pieces
- Divide the mixture in two, wrap with plastic, and cool for 30 minutes. This makes handling so much easier!
- Flatten and Shape
- Sprinkle powdered sugar on your counter, flatten the dough to 1/4-inch thickness, then cut into circles. Try using a small cookie cutter or the lid of a jar.
- Cool Completely
- Stick those circles in the freezer for 30 minutes - this step is vital for smooth dipping!
- Prepare The Coating
- Gently melt your chocolate in the microwave, giving it a stir every 30 seconds. Take your time - scorched chocolate ruins everything!
- Coat and Top
- Drop each frozen circle into chocolate using a fork. Gently tap to remove extra chocolate, transfer to parchment, and add crushed candy canes for a festive touch.
- Allow To Harden
- Let them sit for about an hour at room temperature. It's a tough wait but totally worth it!
Their Unique Appeal
There's something totally satisfying about making candy at home. Your kitchen gets filled with that awesome mint aroma, and you can tweak just how minty or sweet they turn out. And honestly, they taste way fresher and creamier than anything wrapped in foil from the store.
Achieving The Ideal Filling
The real trick to fantastic peppermint patties lies in that smooth center. It needs to hold its shape but still melt when you bite into it. If your mix feels too wet, just sprinkle in extra powdered sugar. Too crumbly? A tiny splash of milk will sort that out.
Simple Chocolate Coating Tips
Don't worry about the coating step! Here's a handy trick: keep your patties ice cold and your chocolate barely melted. Dunk them with a fork, tap off the drips, and slide them onto some parchment. If things get messy, no problem - that's why we taste-test!
Attractive Packaging Ideas
These sweet treats deserve nice presentation! Put parchment paper in a cute tin, stack them carefully, and maybe tie it with a nice ribbon. They make awesome gifts - assuming you can stop yourself from eating them all!
Storage Suggestions
Keep your patties in the fridge and they'll stay good for a week (though they'll probably vanish before then!). Want to make them ahead? They freeze great for up to a month. Just move them to the fridge when you're ready for some minty deliciousness.
Summary
Love these? Try mint cookies next. Or make chocolate mint bark. Both perfect for gifts.
Recipe FAQs
- → Need different mint?
Extract works fine. Less than oil though. Start real small. Taste as you go. Can't fix too much.
- → Melting chocolate right?
Short heat bursts. Stir lots between. Don't get water in. Watch it close. Patient works best.
- → Where keep em good?
Cold box works best. Box em up tight. Good few weeks. Stack with paper. If they last that long!
- → Want em thicker?
Roll less thin. Cut same size though. Still dip good. Might need more chocolate. Takes longer cold.
- → No round cutter?
Glass works fine. Shape by hand too. Keep size same. Whatever works. Still tastes good.
- → Getting too soft?
More sugar helps. Less butter maybe. Chill longer time. Keep em cold. Easy fix quick.
- → Taking em places?
Keep em cold packed. Box with sides good. Layer paper between. Worth ice pack. Maybe backup treats.
- → Need em faster?
Freeze bit helps. Have stuff ready. Quick dip works. Still needs set time. Worth short wait.
- → Making big batch?
Double works fine. Need more space. More chill time. Keep stuff cold. Makes good gifts.
- → Want more mint kick?
Add slow though. Strong stuff works. Taste as you go. Can't fix too much. Fresh mint looks nice.
- → Chocolate not smooth?
Heat slower way. Stir more often. Strain lumps out. Start fresh maybe. Worth doing right.
- → Centers too sticky?
More sugar helps. Chill longer time. Cold hands work. Dust with sugar. Patient helps lots.