
 Pin
Pin
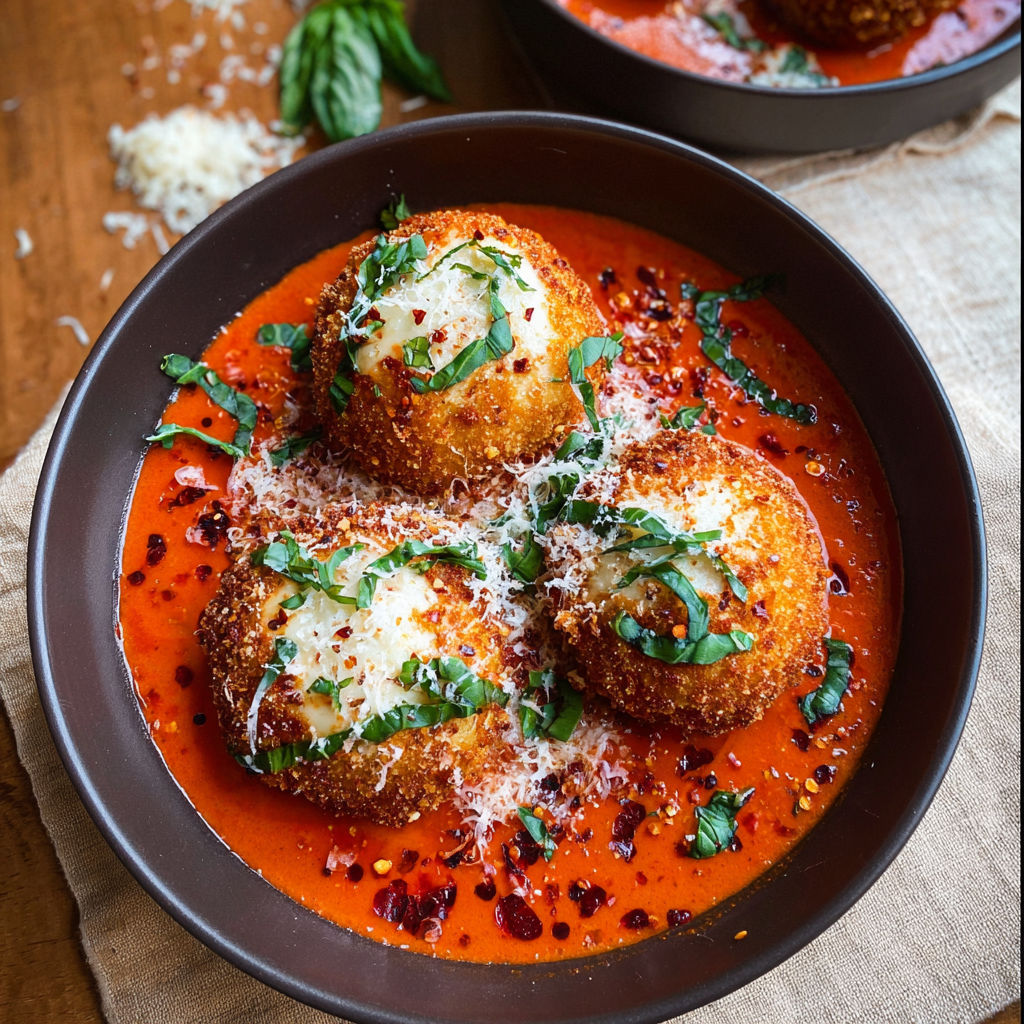
This fried burrata appetizer transforms ordinary cheese into a show-stopping centerpiece that will leave your guests speechless. The contrasting textures of crispy exterior and molten cheese interior create a magical moment when you cut into it, revealing all that creamy goodness ready to spill onto your plate.
I first made this for a small dinner party and my friends still talk about it months later. One guest actually canceled their dessert order because they wanted another serving of this burrata instead!
- Burrata cheese provides that perfect molten center when fried
- Panko breadcrumbs create an exceptionally crispy coating that regular breadcrumbs cannot match
- Tomato paste forms the foundation of our rich sauce and adds concentrated flavor
- Heavy cream balances the acidity of the tomatoes and creates luxurious texture
- Red pepper flakes add gentle heat that complements the creamy cheese beautifully
- Fresh garlic brings aromatic depth to the sauce
- Parmesan cheese adds umami richness to both the coating and sauce
- Create the sauce base
- Heat olive oil in a saucepan over medium heat until it shimmers slightly. Add your minced garlic and cook until it becomes fragrant but not browned, about 60 seconds. Watch carefully as garlic burns quickly and will turn bitter.
- Develop tomato flavor
- Add tomato paste to the garlic oil and cook for a full 2-3 minutes, stirring constantly. This crucial step caramelizes the sugars in the tomato paste, transforming its flavor from raw and acidic to rich and complex. The paste will darken slightly and become fragrant.
- Create creamy consistency
- Slowly whisk in heavy cream, ensuring no lumps form. The mixture will transition from bright red to a beautiful orange hue. Add your seasonings now while the sauce is building its flavor profile. Let it gently simmer for about 5 minutes to thicken slightly.
- Finish the sauce
- Add parmesan cheese and butter, stirring until completely melted and incorporated. The sauce will become glossy and coat the back of a spoon. Taste and adjust seasonings as needed, remembering that the burrata itself is delicate in flavor.
- Set up breading station
- Arrange your three shallow bowls in sequence. First bowl with seasoned flour, second with beaten eggs, and third with your seasoned panko mixture. Having everything in order makes the breading process much cleaner and more efficient.
- Bread with precision
- Gently pat the burrata dry with paper towels to remove excess moisture. Roll each cheese ball carefully in flour, ensuring complete coverage. Dip into the egg wash, allowing excess to drip off. Finally, press firmly into panko mixture, ensuring an even coating all around.
- Master the frying technique
- Heat oil to exactly 350°F using a thermometer for precision. Carefully lower breaded burrata into hot oil using a slotted spoon. Fry until golden brown, about 2-3 minutes, rotating gently for even cooking. The ideal fry creates a shell that protects the cheese from melting too quickly.
- Create the perfect presentation
- Spoon warm sauce onto a serving plate in a circular motion. Place your golden fried burrata in the center like a crown jewel. Garnish with fresh basil leaves and a light dusting of parmesan. Serve immediately with sliced crusty bread positioned around the plate.
My absolute favorite moment with this dish is watching guests' faces when they cut into the burrata and witness that glorious cheese pull. My daughter now requests this for her birthday dinner every year instead of going to a restaurant because she says no restaurant version compares to homemade.
Perfect Temperature Control
The key to successful fried burrata lies in temperature management. Keep your burrata refrigerated until the absolute last moment before breading. The colder the cheese, the better it will hold its shape during frying. Equally important is your oil temperature. Too hot and the exterior burns before creating a proper seal. Too cool and the cheese melts before the coating crisps. A cooking thermometer is not optional for this recipe. Monitor your oil constantly, adjusting heat as needed to maintain that perfect 350°F.
Make-Ahead Strategies
While the fried burrata itself must be prepared just before serving, you can streamline the process. Prepare the sauce up to three days ahead and store in an airtight container in the refrigerator. Reheat gently on low heat, adding a splash of cream if needed to restore its silky consistency. You can also measure and mix your breading components earlier in the day. Just keep the flour, eggs, and panko mixture separate until ready to use. This preparation makes entertaining much less stressful and allows you to focus on the precise timing needed for perfect fried burrata.
Serving Suggestions
This impressive appetizer deserves thoughtful accompaniments. While crusty bread is essential for sauce-dipping, consider adding a small arugula salad dressed with lemon and olive oil to cut through the richness. For special occasions, a glass of prosecco or crisp white wine creates a beautiful pairing that enhances the creamy elements. If serving as part of a larger Italian-inspired meal, follow with something lighter like a seafood pasta or grilled vegetables to balance the richness of this starter.

Recipe FAQs
- → Can I prepare the breaded burrata ahead of time?
You can bread the burrata up to 2 hours ahead and store it in the refrigerator. However, for best results, fry it just before serving to maintain the ideal contrast between the crispy exterior and molten interior.
- → What's the best way to serve fried burrata?
Serve immediately after frying while the exterior is crispy and the center is still warm and gooey. Place it over the warm sauce and provide plenty of crusty bread for dipping. The temperature contrast is essential to the experience.
- → Can I make this dish without a deep fryer?
Absolutely! A deep skillet or pot with enough oil to submerge the burrata works perfectly. Just maintain the oil temperature around 350°F (175°C) for optimal results.
- → What can I substitute for burrata?
While burrata is ideal for its creamy center, you could use large balls of fresh mozzarella as an alternative. The result won't be quite as oozy in the center, but still delicious with the crispy coating and flavorful sauce.
- → Can I make the tomato cream sauce in advance?
Yes! The sauce can be made up to 3 days ahead and stored in the refrigerator. Gently reheat it on the stovetop before serving, adding a splash of cream if needed to adjust consistency.
- → Is there a non-dairy alternative for this dish?
This particular dish relies heavily on dairy for its character. While you could try plant-based cheese alternatives and coconut cream for the sauce, the results would be significantly different from the original.