
 Pin
Pin
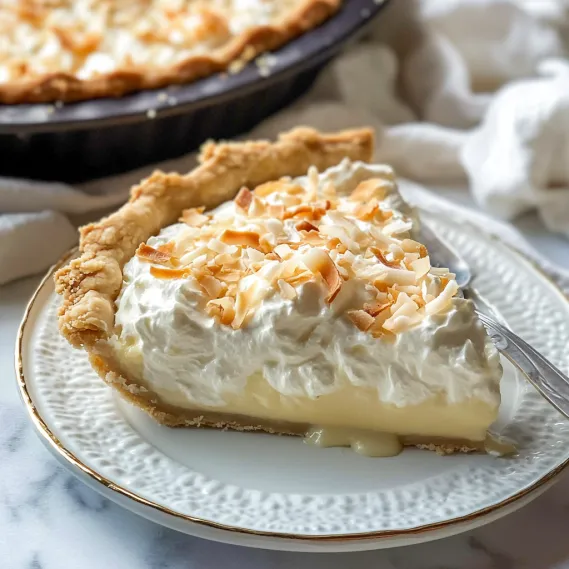
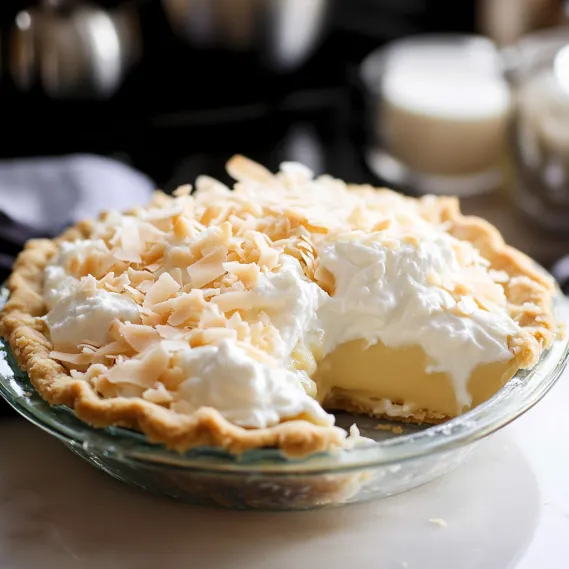
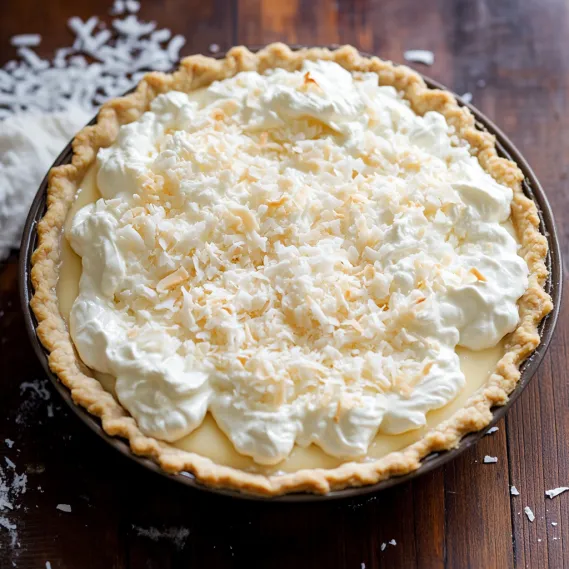
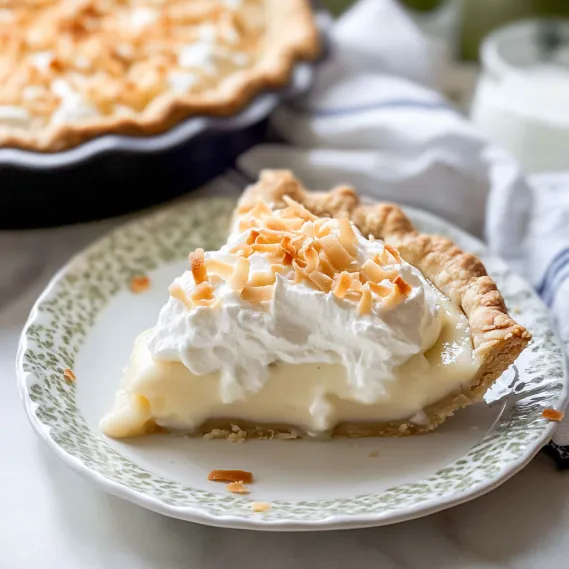
This coconut cream pie delivers pure tropical bliss in every silky-smooth bite. With its flaky, buttery crust, luxuriously thick coconut filling, and crown of pillowy whipped cream, it strikes the perfect balance between indulgence and refinement. Unlike many coconut cream pies that rely on artificial flavors, this recipe layers real coconut throughout – in the creamy filling, the fluffy topping, and the toasted garnish. The result is a dessert that transports you straight to paradise while showcasing the beautiful simplicity of made-from-scratch baking. Whether for holiday gatherings, special celebrations, or simply because you deserve something extraordinary, this pie promises to impress.
I first made this coconut cream pie for a family gathering, not expecting much fanfare. To my surprise, it disappeared before any other dessert, with everyone asking for the recipe – even my uncle who "doesn't like coconut." What I've discovered is that many coconut skeptics have only experienced artificial coconut flavor. When introduced to the real thing in this perfectly balanced pie, they become immediate converts. Now it's requested at nearly every family function, and I've happily obliged so many times that I can make it with my eyes closed.
Essential Ingredients and Selection Tips
- Canned Coconut Milk: Choose full-fat coconut milk (not light) for the richest flavor. Look for it in the international foods aisle, not the refrigerated section where coconut beverages are sold.
- Half-and-Half: Creates the perfect balance of richness without being too heavy. Whole milk works but produces a slightly less luxurious texture.
- Sweetened Shredded Coconut: Provides both flavor and texture. The sweetened variety melds better into the creamy filling than unsweetened.
- Vanilla and Coconut Extracts: Use pure vanilla extract rather than imitation. Coconut extract enhances the natural coconut flavor but can be omitted if unavailable.
- Pie Weights: Essential for blind baking the crust. If you don't have ceramic weights, dried beans work well as an alternative.
Through years of making this pie, I've learned that using canned coconut milk rather than coconut cream results in a better-balanced filling. Coconut cream can make the filling too thick and rich, while regular coconut milk creates the perfect silky consistency that sets up beautifully.
Detailed Cooking Instructions
- Step 1: Prepare Your Perfect Crust
- Roll out your chilled pie dough to fit a 9-inch pie dish, then trim and crimp the edges decoratively. Chill the shaped crust for 30 minutes, then line it with parchment paper and fill with pie weights. Blind bake at 375°F for 15 minutes, remove the weights, prick the bottom with a fork, and return to the oven until golden brown (about 12 more minutes). Cool completely before filling.
- Step 2: Create The Luxurious Filling
- Whisk 4 egg yolks with 1/4 cup cornstarch in a bowl until smooth. In a saucepan, bring 1 can coconut milk, 1 cup half-and-half, 2/3 cup sugar, and 1/4 teaspoon salt to a simmer. Temper the egg mixture by slowly adding 1 cup of the hot liquid while whisking constantly, then pour everything back into the saucepan and cook until thickened, stirring continuously.
- Step 3: Develop Deep Coconut Flavor
- Remove the thickened filling from heat and stir in 1 cup sweetened shredded coconut, 2 tablespoons butter, 1 teaspoon vanilla extract, and 1/2 teaspoon coconut extract. Pour the warm filling into your cooled pie crust, press plastic wrap directly onto the surface to prevent a skin from forming, and refrigerate until completely set (at least 3 hours or overnight).
- Step 4: Perfect The Whipped Topping
- In a chilled bowl, whip 1 1/2 cups cold heavy cream with 3 tablespoons sugar and 1 teaspoon vanilla extract until medium-stiff peaks form. Watch carefully – you want it firm enough to hold its shape but still smooth and creamy, not grainy. For coconut lovers, add 1/4 teaspoon coconut extract to enhance the tropical flavor.
- Step 5: Assemble And Garnish Beautifully
- Remove the chilled pie from the refrigerator and discard the plastic wrap. Pile the whipped cream high on top, creating decorative swirls with the back of a spoon or using a piping bag with a star tip for more formal presentation. Sprinkle generously with toasted coconut (toast in a 350°F oven for 5-8 minutes until golden) just before serving for the perfect finishing touch.
My first attempt at this pie was nearly perfect until I realized the filling hadn't set properly. I've since learned that the mixture must come to a full boil to activate the cornstarch, and you need to see at least one large bubble break the surface before removing it from the heat. Now every pie sets perfectly, with a filling that holds its shape when sliced but still melts in your mouth.
The Secret To Perfect Wok Technique
High heat is essential for authentic fried rice. My grandmother taught me to heat the wok until smoking before adding oil. Keep ingredients moving constantly to achieve that elusive "wok hei" flavor. Never overcrowd the pan—cook in batches instead. This technique transformed my fried rice into restaurant-quality perfection.
Making The Most Of Leftovers
This dish excels at transforming leftovers into something exciting. I've used roast chicken, holiday ham, and even Thanksgiving turkey with great success. Cut meat into uniform pieces that distribute evenly throughout. Leftover grilled steak adds incredible depth with its smoky edges. Even roasted vegetables bring delightful caramelized sweetness.
Balancing Flavors And Textures
Special fried rice succeeds through balanced components. Char siu provides richness, prawns add sweetness, eggs contribute silkiness, while vegetables offer freshness. The sequence matters—aromatics first build flavor, eggs midway remain distinct, vegetables maintain crispness. Adding spring onions last preserves their brightness for that authentic restaurant finish.
Customization For Dietary Needs
This dish adapts easily to dietary restrictions. For vegetarians, I omit meat, double eggs and add extra vegetables. Low-carb diners enjoy my cauliflower rice version that carries flavors beautifully. For gluten-sensitive guests, tamari replaces soy sauce while ensuring chicken powder is certified gluten-free. Everyone enjoys this beloved dish regardless of restrictions.
Mastering The Art Of Tempering
The trickiest part of making coconut cream pie is properly tempering the egg yolks. I've developed a foolproof method after years of practice: use a 2-cup glass measuring cup to whisk the egg yolks and cornstarch, then slowly drizzle in the hot coconut mixture while whisking continuously. The measuring cup's handle and pour spout make it much easier to control when you pour the tempered egg mixture back into the saucepan. Also, I've found that using room temperature egg yolks rather than cold ones from the refrigerator reduces the risk of them curdling during tempering. This small detail has eliminated any anxiety I once had about making custard-based fillings.
Make-Ahead And Transportation Tips
This pie has become my go-to for potlucks and dinner parties because it travels well and can be prepared in stages. I often make the crust and filling a day ahead, then add the whipped cream just before serving. For transportation, I've discovered a brilliant trick: after adding the whipped cream, place toothpicks around the pie and carefully lay plastic wrap over them. The toothpicks act as tent poles, keeping the plastic wrap from touching and ruining your beautiful whipped cream. For summer gatherings, I place the pie in a cooler with ice packs, which maintains its perfect texture even during longer journeys. These strategies have saved me from countless dessert disasters over the years.
Creative Variations To Try
While the classic version is unbeatable, I've experimented with several variations that have been hugely successful. For holiday gatherings, I sometimes add 2 tablespoons of dark rum to the filling for sophisticated depth. During summer, folding 1/2 cup finely diced fresh mango into the filling creates a tropical twist that's unbelievably good. For chocolate lovers in my family, I occasionally sprinkle 1/3 cup toasted coconut mixed with 2 tablespoons mini chocolate chips between the filling and whipped cream layer. And when hosting friends who prefer less sweetness, I've successfully reduced the sugar in both the filling and whipped cream by 25% without compromising texture or flavor balance.
This coconut cream pie has become much more than just a dessert in my repertoire—it's now a symbol of celebration in our family. From Easter gatherings to birthday festivities, its appearance on the table signals a special occasion. The way everyone's eyes light up when they see it, and how conversation inevitably pauses with the first bite, reinforces why making desserts from scratch is such a meaningful expression of love. This isn't just about following a recipe; it's about creating moments and memories that linger long after the last crumb has disappeared.
Recipe FAQs
- → Homemade crust needed?
- No, store-bought works if baked.
- → Coconut milk type?
- Full-fat canned—thick and rich.
- → Chill time?
- 3 hours minimum, overnight’s great.
- → Can I freeze?
- Yep, after filling—3 months max.
- → Good for gatherings?
- A hit with all ages!