
 Pin
Pin
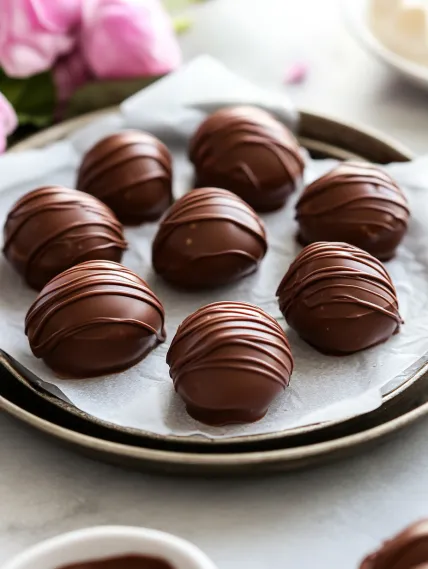
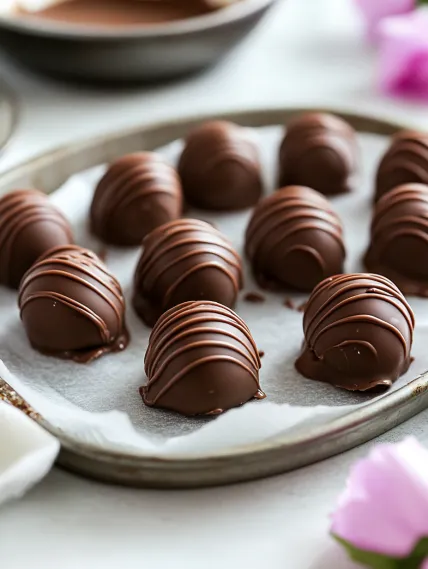
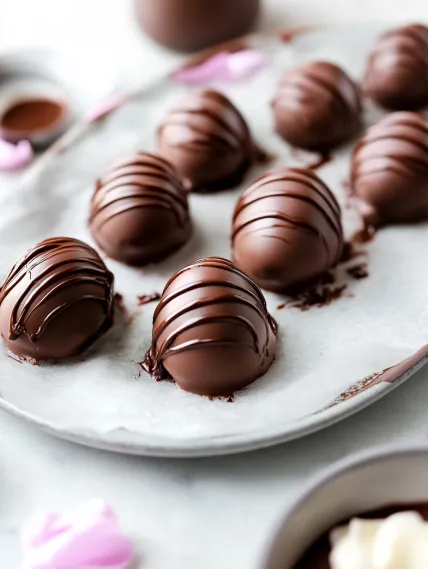
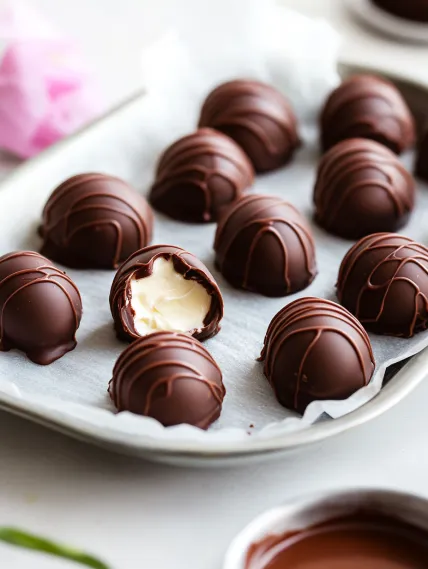
These homemade Easter egg buttercream candies transform simple ingredients into luxurious, melt-in-your-mouth treats that rival anything from fancy chocolate shops. The silky-smooth buttercream center offers the perfect canvas for countless flavor variations, all enrobed in rich, quality chocolate for an indulgent bite every time. With their pretty egg shape and customizable flavors, these sweet confections make perfect Easter basket additions, hostess gifts, or special treats to enjoy throughout spring. They're deliciously decadent, wonderfully customizable, and so much more special than store-bought alternatives.
I started making these buttercream eggs after wondering what exactly was in those chocolate-covered eggs at the store. After experimenting with different buttercream consistencies and chocolate techniques, this recipe has become our family's Easter tradition. My children look forward to our annual candy-making session, each choosing their favorite flavor variation. Even my mother-in-law, who's quite particular about sweets, requested the recipe after trying them at our Easter gathering.
Essential Ingredients and Selection Tips
- Butter: The foundation of the buttercream filling. Use unsalted, room temperature butter (left out for exactly 1 hour) for the perfect consistency.
- Confectioners' Sugar: Creates the sweet, thick filling that holds its shape. Sift it first for the smoothest texture.
- Heavy Cream: Adds richness and creaminess to the filling. You can substitute half-and-half in a pinch.
- Quality Chocolate: Use real baking chocolate bars, not chips. This makes all the difference in how the coating looks, tastes, and sets.
- Flavorings: Vanilla extract provides the base flavor, while additional extracts allow for customization.
The quality of your chocolate truly makes or breaks these candies. I've found that Ghirardelli or Baker's baking bars deliver consistent results. While they're slightly more expensive than chocolate chips, the improved flavor and melting properties are absolutely worth the investment.
Detailed Cooking Instructions
- Step 1: Create The Perfect Buttercream Base
- Beat 1/2 cup room temperature butter until creamy and smooth, about 2 minutes. Gradually add 2 1/4 cups confectioners' sugar, alternating with 2 tablespoons heavy cream. Continue beating until completely incorporated and smooth. Add 1 1/2 teaspoons vanilla extract and 1/2 teaspoon almond extract, beating until combined and thick.
- Step 2: Chill For Proper Consistency
- Cover the buttercream filling and refrigerate for at least 1 hour. This critical step firms up the buttercream, making it much easier to shape. Don't rush this chilling time or you'll end up with buttercream that's too soft to work with.
- Step 3: Shape Into Perfect Eggs
- Scoop chilled buttercream using a tablespoon measure (about 1 ounce per egg). Roll each portion into a ball, then gently flatten between your palms. Shape one end to be slightly narrower, creating an egg shape. Place shaped eggs on a parchment-lined baking sheet and refrigerate again for at least 1 hour until firm.
- Step 4: Master The Chocolate Coating
- Chop 16 ounces of baking chocolate into small, even pieces. Melt slowly in a microwave-safe bowl using 20-second intervals, stirring thoroughly between each. When almost fully melted, add 1 teaspoon vegetable oil and stir until completely smooth. Allow to cool for 3-5 minutes so it won't melt the buttercream.
- Step 5: Dip With Precision
- Working with one cold buttercream egg at a time, dip completely in the melted chocolate using a fork. Tap the fork gently against the bowl's edge to remove excess chocolate. Use a toothpick to help slide the candy onto a parchment-lined baking sheet. If desired, drizzle with remaining chocolate for decoration. Refrigerate until chocolate is completely set, about 30 minutes.
When I first made these candies, I skipped the second chilling step, thinking the shaped eggs were firm enough. The result was a messy disaster - the buttercream started melting the moment it hit the warm chocolate! Now I know that thoroughly chilled eggs are absolutely crucial for clean dipping and beautiful results.
Endless Flavor Possibilities
The versatility of these buttercream eggs is what makes them truly special. While the vanilla-almond base is delicious on its own, I love creating variety by dividing the buttercream and making several different flavors. For coconut lovers, replacing the almond extract with coconut extract and adding 1/2 cup of finely chopped shredded coconut creates a tropical treat. Lemon buttercream eggs made by substituting lemon extract for the almond are refreshingly bright and perfect for spring. My children's favorite is the chocolate-filled version, where I replace 2 tablespoons of confectioners' sugar with cocoa powder for a double-chocolate delight. For sophisticated palates, adding 1 teaspoon of espresso powder creates coffee-flavored eggs that pair beautifully with dark chocolate coating. Each Easter, we create an assortment of flavors, which makes for a beautiful presentation and ensures there's something for everyone.
Professional Presentation Techniques
After years of making these buttercream eggs, I've developed a few tricks for giving them that professional candy shop appearance. The first secret is patience during the dipping process. After submerging the egg in chocolate, I let the excess drip off for a full 5-10 seconds, gently tapping the fork on the bowl's edge. Then I use a toothpick to slide the egg onto the parchment paper, which prevents chocolate pooling around the base. For decoration, I transfer remaining melted chocolate to a small plastic bag, snip off a tiny corner, and pipe delicate lines across the tops. Sometimes I'll even use white chocolate for contrasting drizzles. For special occasions, I've sprinkled still-wet chocolate with gold edible dust or tiny sugar pearls, turning these simple candies into elegant confections that look like they came from a high-end chocolatier.
Perfect Storage Solutions
Because these buttercream eggs contain fresh dairy, proper storage is essential. They'll keep beautifully in an airtight container in the refrigerator for up to 2 weeks, though they rarely last that long in my household! If you're making them ahead for Easter, they actually improve after a day or two as the flavors meld and develop. For gifting, I bring them to room temperature for about 10-15 minutes before serving, which softens the buttercream to that perfect melt-in-your-mouth consistency. I've discovered these eggs can also be frozen for up to 3 months - just thaw overnight in the refrigerator. This makes them perfect for advance holiday preparation or for saving a few treats to enjoy long after Easter has passed. My husband actually prefers them straight from the freezer, claiming they taste like ice cream bites!
Gifting and Presentation Ideas
These buttercream eggs turn into memorable gifts with thoughtful packaging. For Easter baskets, I individually wrap each egg in colorful foil candy wrappers (available at craft stores) and nestle them among paper grass. For hostess gifts, I line small bakery boxes with tissue paper and arrange an assortment of different flavored eggs, adding a handwritten note listing the varieties. At our family Easter gathering, I create a beautiful dessert display by arranging the eggs on a tiered serving plate, using small labels to identify each flavor. For children's parties, I've even used white chocolate colored with oil-based candy coloring to create pastel-coated eggs that look stunning arranged in a circle around a chocolate bunny centerpiece.
These Easter egg buttercream candies have become more than just a treat in our house - they're a cherished tradition that marks the arrival of spring. There's something magical about transforming simple ingredients into something so special, and the joy on people's faces when they bite into these homemade candies makes all the effort worthwhile. Whether you're making them as gifts, for entertaining, or simply to enjoy with your family, these little eggs deliver pure happiness in every bite.
Recipe FAQs
- → Chill time needed?
- Yes, for shaping and coating.
- → Flavor tweak?
- Skip almond, boost vanilla.
- → Chocolate type?
- Baking bars, not chips.
- → Good to freeze?
- Sure, 3 months max.
- → Party snack?
- Great for little hands!