
 Pin
Pin
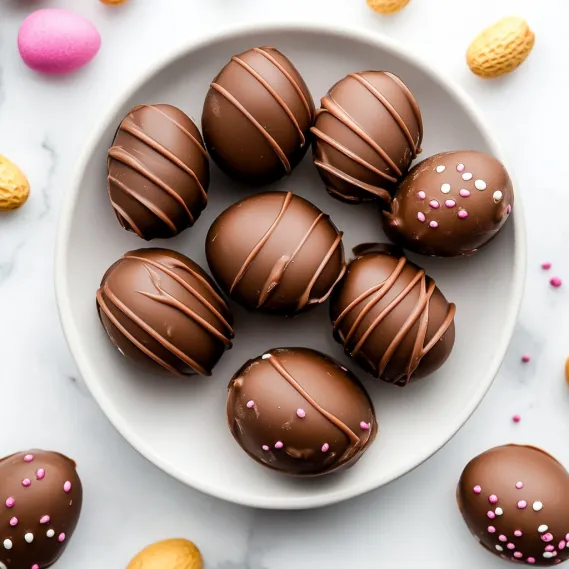
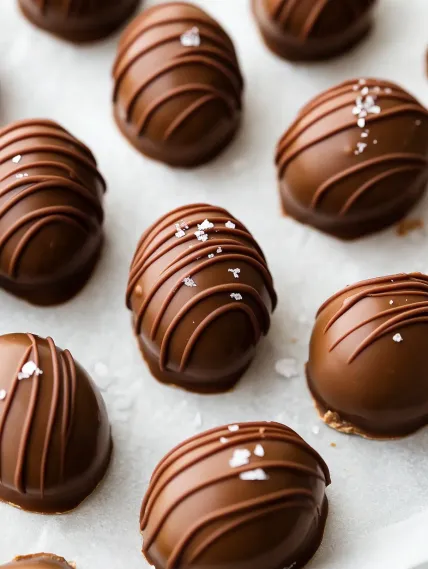
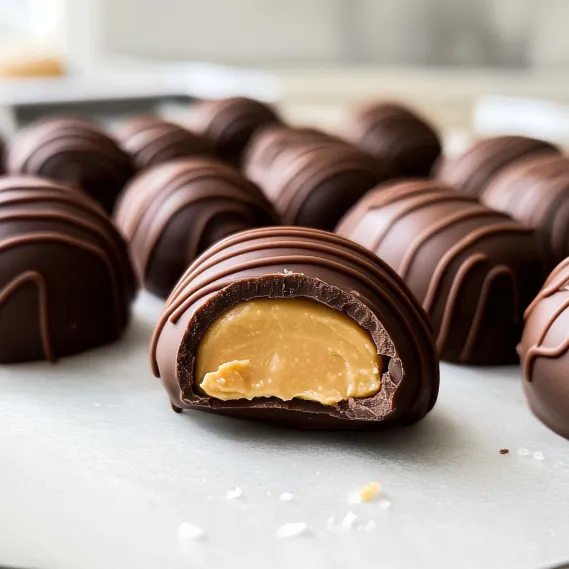
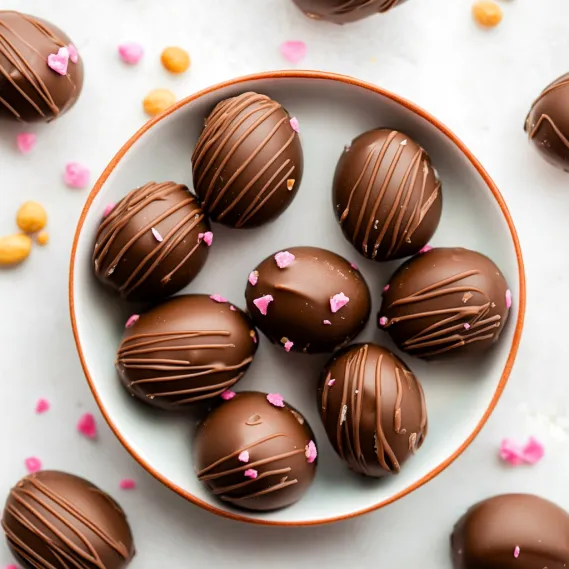
These homemade chocolate peanut butter Easter eggs deliver the perfect combination of creamy, sweet peanut butter filling encased in rich chocolate coating. Every bite provides that nostalgic chocolate-peanut butter flavor we all crave, reminiscent of store-bought favorites but with a fresher, more indulgent taste. The soft, melt-in-your-mouth peanut butter center contrasts beautifully with the snappy chocolate shell, creating a textural experience that makes these treats irresistible. A sprinkle of flaky sea salt on top elevates these simple candies to gourmet status.
I first made these Easter egg candies when looking for a homemade alternative to commercial peanut butter eggs. After countless batches and several adjustments to get the perfect peanut butter filling consistency, these have become my family's most requested springtime treat. My nephew, who's notoriously picky, declared them "even better than the ones from the store" - which is high praise indeed from a 10-year-old chocolate connoisseur!
Essential Ingredients and Selection Tips
- Creamy Peanut Butter: Use conventional brands like Jif or Skippy for the right consistency. Natural peanut butter will make the filling too dry and crumbly.
- Butter: Provides richness and helps the filling hold its shape. Make sure it's softened but not melted for the perfect texture.
- Confectioners' Sugar: Sweetens and binds the filling. The amount in this recipe creates the perfect balance of sweetness without overpowering the peanut butter flavor.
- Pure Baking Chocolate: Invest in good quality baking bars for the smoothest, most delicious coating. Chocolate chips don't melt properly for coating.
- Flaky Sea Salt: An optional but recommended finishing touch that balances the sweetness beautifully.
The quality of your peanut butter makes a huge difference in these candies. I've experimented with natural varieties, but they simply don't create the right texture. The conventional brands have the perfect consistency and flavor for candy making.
Detailed Cooking Instructions
- Step 1: Prepare The Perfect Filling
- Beat 6 tablespoons softened butter until creamy, then add 1 cup creamy peanut butter, mixing until completely combined. Gradually add 2 cups confectioners' sugar, 1 teaspoon vanilla extract, and 1/4 teaspoon salt, beating until the mixture forms a thick, moldable dough. It should be firm enough to shape but not dry or crumbly.
- Step 2: Shape Your Easter Eggs
- Use a medium cookie scoop or measuring spoon to portion out 1 1/2 tablespoons of filling. Roll each portion into a ball, then flatten between your palms to about 3/4-inch thickness. Shape one end to be slightly narrower, creating an egg-like shape. Place the shaped eggs on a parchment-lined baking sheet.
- Step 3: Chill For Success
- Refrigerate the shaped peanut butter eggs for at least 1 hour or until firm. This critical step ensures they hold their shape during dipping and prevents them from melting into the warm chocolate. For even better results, refrigerate overnight - this allows the flavors to meld and makes dipping easier.
- Step 4: Master The Chocolate Coating
- Chop 12 ounces of quality baking chocolate into small pieces for even melting. Heat in a microwave-safe bowl in 20-second intervals, stirring well between each, until almost completely melted. Add 1 teaspoon vegetable oil and stir until smooth. Let cool for 5 minutes so it won't melt the filling.
- Step 5: Dip And Decorate
- Working with one chilled egg at a time, dip completely in chocolate using a fork. Tap the fork against the bowl's edge to remove excess chocolate, then use a toothpick to slide the egg onto the parchment paper. Immediately sprinkle with flaky sea salt or festive sprinkles if desired. Refrigerate until chocolate is completely set, about 30 minutes.
I learned the importance of properly chilling the eggs through a memorable kitchen disaster. My first attempt, I was impatient and tried dipping after just 15 minutes in the refrigerator. The eggs immediately began dissolving in the warm chocolate, creating a messy (though still delicious) chocolate-peanut butter soup! Now I always make these a day ahead, shaping and chilling overnight for perfect results.
Creating Professional-Looking Candies
The secret to gorgeous homemade candies lies in the dipping technique. I've developed a method that creates a smooth, even coating without the telltale pooling around the bottom that screams "homemade." After dipping each egg, I tap the fork firmly against the bowl's edge several times to remove excess chocolate. Then, I slide the egg off the fork using a gentle back-and-forth motion rather than simply pushing it off. This creates a cleaner release. For an extra-professional touch, I use any leftover chocolate to pipe decorative lines across the tops. Simply transfer remaining chocolate to a small plastic bag, snip a tiny corner, and drizzle in a zigzag pattern. My friends always ask if I bought them from a specialty chocolate shop.
Perfect Pairings And Gift Ideas
These Easter egg candies make wonderful gifts when packaged thoughtfully. I line small gift boxes with colored tissue paper and arrange 6-8 eggs inside for a presentation that rivals expensive chocolate shops. For Easter baskets, I wrap individual eggs in colorful foil (available at craft stores) for a festive touch. These treats pair beautifully with spring beverages - try them alongside a cup of good coffee or, my personal favorite, a glass of cold milk. For an adult Easter gathering, they're delicious with a dessert wine or even a bourbon neat, which complements the peanut butter beautifully.
Storage And Make-Ahead Tips
One of the best things about these candies is how well they keep. Store them in an airtight container in the refrigerator for up to 2 weeks, though they rarely last that long in my house! You can also freeze the uncoated peanut butter eggs for up to 3 months - simply shape them, freeze solid on a baking sheet, then transfer to a freezer bag. When ready to finish, thaw overnight in the refrigerator before dipping in chocolate. For Easter entertaining, I often make these up to a week ahead, which takes pressure off holiday preparation. Just be sure to bring them to room temperature for about 10 minutes before serving for the best flavor and texture.
These homemade peanut butter Easter eggs have become such a tradition in my family that the holiday wouldn't feel complete without them. There's something deeply satisfying about creating something so delicious from such simple ingredients. The process of shaping and dipping can even become a fun family activity - though I admit I'm rather particular about the dipping part! Whether you're making them as gifts, for an Easter celebration, or simply to satisfy a chocolate-peanut butter craving, these candies deliver joy in every bite.
Recipe FAQs
- → Can I use natural peanut butter for these candies?
- It's best to avoid natural peanut butter for this recipe. Natural peanut butter (the kind that separates and needs stirring) has a higher oil content and different texture that makes the filling too soft and oily to hold its shape properly. Stick with conventional creamy peanut butter brands like Jif or Skippy for the best results.
- → Why can't I use chocolate chips for coating?
- Chocolate chips contain stabilizers that help them maintain their shape when baked, but these same stabilizers prevent them from melting into the smooth, fluid consistency needed for dipping. For the best coating, use chocolate bars marketed as 'baking chocolate' or chocolate melting wafers, which will melt smoothly and set with a nice snap.
- → My peanut butter mixture is too crumbly to shape - what can I do?
- If your mixture is too crumbly, there are a few fixes: 1) Keep working it with your hands - the warmth will help it come together; 2) Add 1/2-1 teaspoon of water or a little more butter and mix again; 3) Make sure your butter was properly softened before mixing. If it's too soft and sticky instead, refrigerate the mixture for 15-20 minutes to firm it up before shaping.
- → Can I make these candies in different shapes?
- Absolutely! While the egg shape is traditional for Easter, you can form the peanut butter filling into any shape that's easy to dip - balls, hearts, or flattened discs all work well. Just make sure the shapes aren't too thin or they may break when dipped, and adjust chilling time as needed depending on the size of your shapes.
- → How do I get a smooth chocolate coating without marks or pooling?
- For a professional-looking finish: 1) Make sure the peanut butter eggs are thoroughly chilled before dipping; 2) Tap excess chocolate off gently but thoroughly; 3) Use a fork to dip and another fork or toothpick to slide the candy off onto the parchment; 4) If you notice pools forming around the base, wait until the chocolate begins to set (but isn't completely hard) and then use a small knife to trim around the edges.
- → Can I use other nut butters instead of peanut butter?
- Yes, you can substitute other nut butters like almond butter or cashew butter, but expect some differences in texture and flavor. Almond butter tends to be thicker and may require a bit more butter to achieve the right consistency. Also, because these alternatives are often less sweet than commercial peanut butter, you might want to taste and adjust the sugar content.