
 Pin
Pin
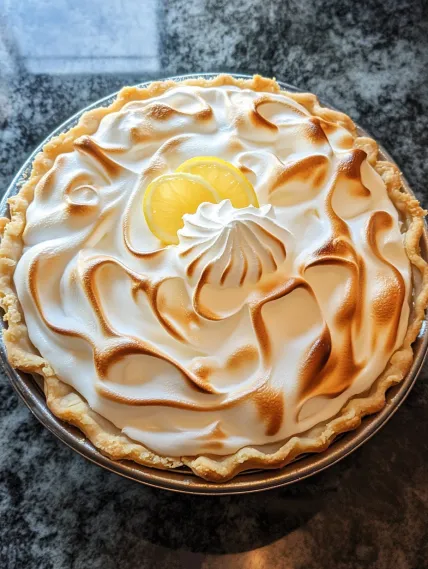
This classic lemon meringue pie delivers the perfect balance of flavors and textures in every slice. The flaky, buttery crust provides a sturdy foundation for the bright, tangy lemon filling that strikes the ideal balance between sweet and tart. Crowned with a pillowy cloud of toasted meringue, each bite offers a delightful contrast of temperatures and textures. This showstopping dessert may seem intimidating, but with the right techniques, you'll create a pie worthy of any special occasion.
I spent months perfecting this recipe, making at least a dozen pies until I got it just right. After forcing slice after slice on friends and family (tough job for them, I know), the feedback was unanimous - this version achieves the perfect balance of flavors and solves all the common pitfalls that plague many lemon meringue pies. The smile on my grandmother's face when she declared it "even better than mine" told me all I needed to know.
Essential Ingredients and Selection Tips
- Lemons: Fresh is absolutely essential here. You'll need both the juice and zest, so choose bright, fragrant lemons with thin skins for maximum juice.
- Egg Yolks: These provide richness and thickening power to the filling. The deeper the color, the more vibrant your filling will be.
- Egg Whites: The foundation of your meringue must be completely free of any yolk contamination for proper whipping.
- Cornstarch: The secret to a sliceable filling that's neither too runny nor too firm. Don't substitute other thickeners.
- Cream of Tartar: This acidic ingredient stabilizes the meringue, preventing weeping and creating a more stable structure.
The quality of your lemons makes a tremendous difference in this pie. I've found that during winter and early spring, Meyer lemons create an exceptionally aromatic filling, while regular lemons work beautifully year-round. Whatever you do, skip the bottled juice – the fresh stuff is worth every second of squeezing.
Detailed Cooking Instructions
- Step 1: Prepare The Perfect Crust Foundation
- Blind bake your pie crust at 375°F until partially baked - about 15-20 minutes with pie weights, then 5-7 minutes without. The crust should be lightly golden but not fully browned. This partial bake ensures it won't get soggy when filled, yet will finish cooking perfectly with the assembled pie.
- Step 2: Master The Lemon Filling
- In a medium saucepan, whisk together 1½ cups water, 1½ cups granulated sugar, ⅓ cup cornstarch, and ¼ teaspoon salt. Bring to a boil over medium heat, stirring constantly until thickened. Remove from heat. In a separate bowl, whisk 5 egg yolks, then gradually whisk in 1 cup of the hot mixture to temper the eggs. Return this mixture to the saucepan and cook 2 more minutes. Remove from heat and stir in 2 tablespoons butter, ½ cup fresh lemon juice, and 2 teaspoons lemon zest.
- Step 3: Create Cloud-Like Meringue
- In a completely clean, dry bowl, beat 5 room temperature egg whites with ½ teaspoon cream of tartar until soft peaks form. Gradually add ½ cup granulated sugar, 1 tablespoon at a time, continuing to beat until stiff, glossy peaks form. Don't underbeat or your meringue won't hold its shape; don't overbeat or it will become grainy.
- Step 4: Assemble With Proper Technique
- Pour the still-hot lemon filling into the warm pie crust. Immediately dollop the meringue onto the hot filling, starting at the edges and working toward the center. Make sure the meringue touches the crust all around to create a seal. Use the back of a spoon to create decorative peaks and swirls in the meringue.
- Step 5: Achieve Perfect Toasting
- Bake the assembled pie at 350°F for 20-25 minutes, until the meringue is golden brown with darker tips. Baking rather than broiling ensures the meringue cooks through completely, creating a stable structure that's less likely to weep. Cool the pie at room temperature for 2 hours, then refrigerate for at least 4 hours before slicing.

I learned the importance of sealing the meringue to the crust the hard way. My first few attempts left a gap between filling and meringue, creating a watery layer that ruined the texture. Now I always make sure to spread the meringue right to the edge, touching the crust to create that essential seal.
The Science Behind Perfect Meringue
The key to stable, beautiful meringue lies in understanding a few simple scientific principles. Egg whites are primarily protein and water. When beaten, these proteins unfold and then bond together, creating a network that traps air bubbles. Adding cream of tartar lowers the pH, which helps stabilize these proteins. Sugar not only sweetens the meringue but also strengthens the protein network and helps hold in moisture. This is why it's critical to add sugar gradually after soft peaks form - added too early, it interferes with protein unfolding; too late, and it won't dissolve properly. The first time I made this pie without cream of tartar, my meringue wept dramatically. Adding this simple ingredient transformed my results completely.
Solving The Watery Filling Dilemma
Finding the perfect consistency for lemon filling took me numerous attempts. Too much lemon juice creates a filling that won't set properly; too little leaves you with bland flavor. The cornstarch amount is equally crucial - too much creates a gummy texture, too little leaves you with soup. Through trial and error, I discovered that cooking the filling thoroughly both before and after adding the egg yolks is essential for activating the cornstarch's thickening power. The filling should coat the back of a spoon and leave a clear path when you run your finger through it. My neighbor, who claimed to have never enjoyed lemon meringue pie because of "that soupy filling," became an instant convert after trying this version.
Make-Ahead Options For Stress-Free Entertaining
While lemon meringue pie is best enjoyed within 24 hours of baking, you can prepare components ahead of time to make assembly easier. The pie crust can be blind-baked up to 3 days in advance and kept at room temperature, well-wrapped. The lemon filling can be prepared up to 2 days ahead and kept refrigerated with plastic wrap pressed directly on the surface to prevent a skin from forming. Simply rewarm it gently before pouring into the crust. The meringue, however, should always be made fresh just before assembly. When hosting Easter dinner last year, I prepared the crust and filling the day before, which allowed me to focus on assembling and baking the pie while my main dishes cooked.
Seasonal Variations Worth Trying
While classic lemon meringue pie is perfection as is, I've experimented with seasonal adaptations that have been well-received. In summer, adding a tablespoon of finely chopped basil to the filling creates an unexpected herbal note that pairs beautifully with the lemon. For fall gatherings, I sometimes add 1/4 teaspoon of cinnamon to the meringue before beating, which adds warmth without overwhelming the bright lemon flavor. During winter holidays, replacing one tablespoon of lemon juice with cranberry juice and adding 1/2 teaspoon of orange zest creates a festive variation. My family's favorite remains the classic version, but these subtle changes allow this timeless dessert to reflect the changing seasons.
This classic lemon meringue pie has become my signature dessert, the one friends and family request for special occasions. There's something magical about the combination of buttery crust, bright filling, and cloudlike topping that makes people's eyes light up when it's brought to the table. While it requires a bit more attention than some desserts, the results are absolutely worth it. Each component on its own is delicious, but together, they create something truly extraordinary.
Recipe FAQs
- → Why is my meringue weeping or shrinking?
- Meringue can weep or shrink for several reasons: 1) The filling wasn't hot when the meringue was added - always spread meringue over warm filling to create a seal; 2) The meringue wasn't spread all the way to the crust edges; 3) The egg whites weren't at room temperature; 4) The meringue was overbeaten; or 5) The pie was baked in a humid environment. Make sure to follow all the tips in the recipe for best results.
- → How do I prevent a soggy bottom crust?
- To prevent a soggy bottom crust, you must blind bake (pre-bake) the crust before adding the filling. Line your pie crust with parchment paper, fill with pie weights or dried beans, and bake at 375°F for about 15 minutes. Then remove the weights and parchment and bake another 5-10 minutes until the bottom is lightly golden. This creates a barrier that prevents the wet filling from making the crust soggy.
- → Can I make lemon meringue pie ahead of time?
- Lemon meringue pie is best enjoyed the day it's made. However, you can prepare components ahead: the pie crust can be made up to 5 days ahead (refrigerated) or 3 months ahead (frozen). You can also blind bake the crust a day ahead. The assembled pie needs to chill for 4 hours before serving, so plan accordingly. Unfortunately, this pie doesn't freeze well, as both the filling and meringue textures are negatively affected.
- → Why is my lemon filling runny?
- A runny filling is usually caused by undercooking. The filling must be cooked until it's quite thick and large bubbles burst on the surface. Another cause could be inaccurate measurement of cornstarch - be precise! Also, make sure to temper the egg yolks properly by slowly streaming the hot mixture into them while whisking constantly, then returning the mixture to the pan to finish cooking.
- → How do I know when my meringue is beaten to 'stiff peaks'?
- Meringue has reached stiff peaks when you lift the beater out of the mixture and the peaks stand straight up without flopping over at the tips. The meringue should be glossy and smooth, not dry or grainy looking. Be careful not to overbeat, as this can cause the meringue to break down and weep during baking.
- → Can I use bottled lemon juice instead of fresh?
- For the best flavor, always use freshly squeezed lemon juice. Bottled lemon juice often has preservatives and a somewhat stale taste that will be noticeable in the filling. Since the lemon flavor is the star of this dessert, using fresh juice and zest makes a significant difference in the final taste.