
 Pin
Pin
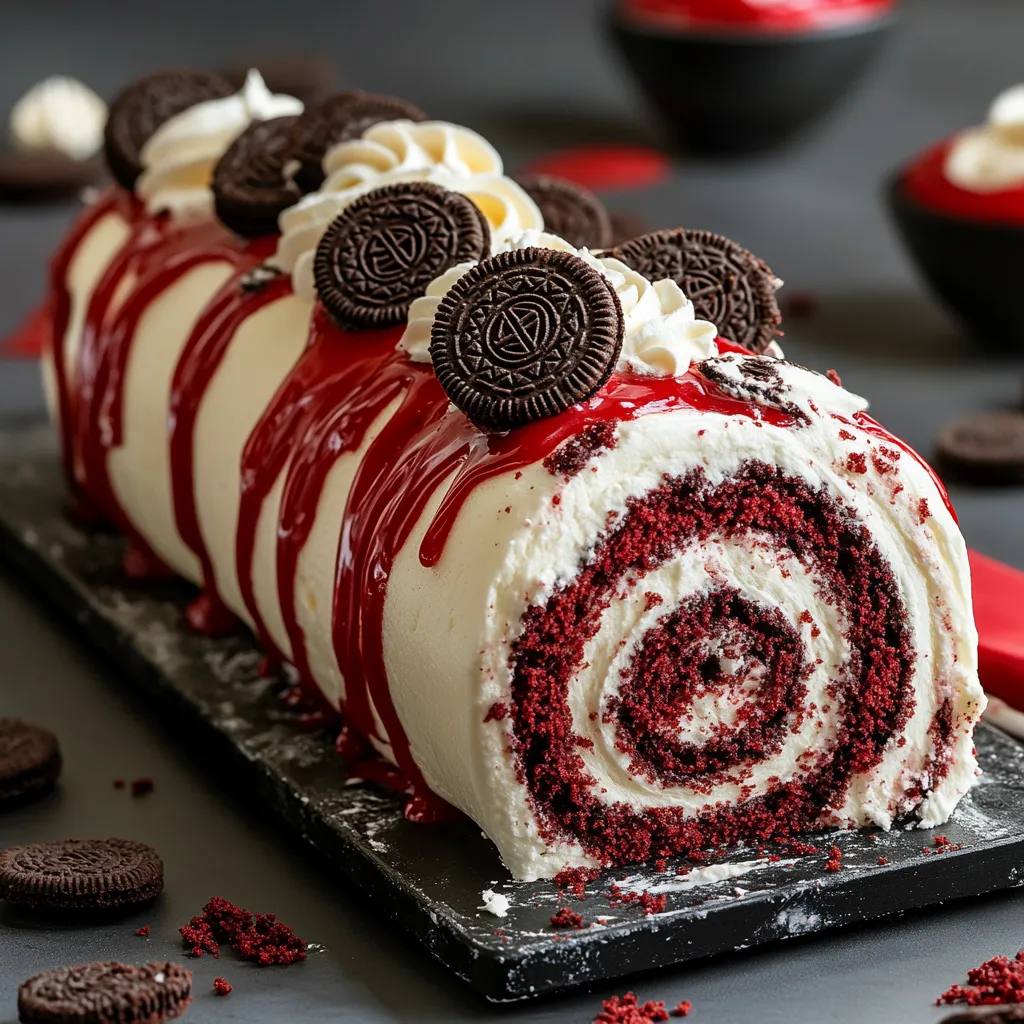
A Red Velvet Oreo Cake Roll combines two beloved flavors into one stunning dessert. This show-stopping treat features a soft, crimson-hued cake wrapped around a cookies-and-cream filling, all enrobed in rich chocolate ganache. The striking red spiral revealed with each slice makes this dessert as visually impressive as it is delicious.
I first made this cake for my daughter's birthday, and the look of amazement on everyone's faces when I sliced into it made all the effort worthwhile. The contrast between the bright red cake and creamy white filling creates that perfect "wow" moment.
Essential Ingredients:
- All-purpose flour - use unbleached for the most delicate texture
- Dutch-process cocoa powder - provides richer color and smoother chocolate flavor than natural cocoa
- Buttermilk - creates tenderness and helps activate the red color
- Red food coloring - gel coloring gives the most vibrant results without affecting texture
- Cream cheese - Philadelphia brand works best for the filling due to its consistent texture
- Oreos - choose regular, not Double Stuf, for the best filling-to-cookie ratio
- Heavy cream - at least 36% fat content ensures your ganache will be silky smooth
Detailed Instructions:
- Prepare Your Workspace
- Lay out all ingredients at room temperature
- Have clean kitchen towel ready and dusted with powdered sugar
- Position oven rack in center position
- Ensure your jelly roll pan is completely clean and dry
- Master the Cake Mixing
- Beat eggs and sugar until the mixture falls in thick ribbons
- Fold dry ingredients with a light hand, using figure-eight motions
- Stop mixing as soon as streaks disappear to prevent tough cake
- Spread batter evenly, getting into corners of pan
- Perfect the Rolling Technique
- Work quickly while cake is hot
- Use gentle but firm pressure when rolling
- Keep the roll tight but don't squeeze
- Let cool completely in towel to set shape
- Create the Filling
- Beat cream cheese until absolutely smooth before adding sugar
- Crush Oreos into varied sizes for texture interest
- Spread filling evenly but not too thick at edges
- Leave border to prevent overflow
- Final Assembly
- Unroll cake slowly to prevent cracking
- Re-roll with steady, even pressure
- Chill before ganache coating
- Pour ganache at right temperature for perfect coverage
Growing up, my grandmother always said the secret to a perfect cake roll was patience. She was right - rushing any step can lead to cracks or uneven rolling. I've found that taking my time, especially during the initial hot roll, makes all the difference in the final presentation.
Additional Insights:
The combination of red velvet and Oreos might seem modern, but it's rooted in classic American dessert traditions. My family particularly loves this version because it brings together the sophistication of a Swiss roll with the fun of everyone's favorite sandwich cookie. When my nephew tried it for the first time, he declared it "the best cake ever" - high praise from a picky eight-year-old!
After years of making various cake rolls, this red velvet version remains one of my favorites. It's that rare dessert that combines elegant presentation with crowd-pleasing flavors, making it perfect for any occasion from holiday gatherings to birthday celebrations.
Seasonal Decorating Ideas:
Transform this cake roll for different occasions throughout the year. For Christmas, add mint Oreos and sprinkle with crushed candy canes. During Halloween, use orange-colored white chocolate drizzle with black Oreos. For spring celebrations, decorate with edible flowers and white chocolate shavings. The versatility of the base recipe makes it perfect for any season.
The Science of Perfect Rolling:
The success of a cake roll largely depends on its texture. Too dry, and it cracks; too moist, and it becomes sticky. The combination of oil and buttermilk in this recipe creates the perfect moisture level for rolling. The proteins in the eggs, when properly whipped, create a structure that's both sturdy and flexible. This is why beating the eggs until they're properly pale and thick is crucial.
Make-Ahead Strategies:
This cake roll actually benefits from being made a day ahead. The flavors meld together, and the filling sets to the perfect consistency. You can prepare the cake roll without the ganache up to two days in advance, keeping it well-wrapped in the refrigerator. Add the ganache coating within 24 hours of serving for the freshest appearance.
Troubleshooting Common Issues:
If your cake cracks while rolling, don't panic. Small cracks can be filled with the cream cheese filling, and larger ones can be covered with ganache. If your ganache seems too thick, warm it gently in 5-second microwave bursts. Too thin? Let it cool at room temperature, stirring occasionally until it reaches the right consistency.
Serving Suggestions:
Cut slices with a warm, sharp knife for the cleanest presentation. Place each slice on its side to showcase the spiral pattern. A light dusting of powdered sugar or a fresh raspberry garnish adds an elegant touch. For special occasions, serve with a scoop of vanilla bean ice cream or a dollop of whipped cream.
Storage Solutions:
Keep the cake roll refrigerated in an airtight container. If you need to store it for more than three days, individual slices can be wrapped in plastic wrap and frozen. Thaw frozen slices overnight in the refrigerator for the best texture. Never thaw at room temperature, as this can cause the filling to become too soft.
Flavor Variations:
While the classic Oreo filling is amazing, you can experiment with different cookie varieties. Try mint Oreos for a refreshing twist, or golden Oreos for a more subtle flavor. Some of my family members prefer it with chocolate cream cheese filling instead of vanilla, which makes the red velvet flavor really pop.
Creating Perfect Slices:
The key to picture-perfect slices is temperature control. The cake should be well-chilled but not frozen. Use a large, sharp knife dipped in hot water and wiped dry between each cut. Make your cuts in one smooth, downward motion rather than sawing back and forth.
The Finishing Touch:
A perfectly smooth ganache coating takes this cake from homemade to professional-looking. The key is temperature - both the cake roll and the ganache should be at the right temperature. The ganache should flow easily but not be so warm that it runs off thecake in thin drips. If needed, do a test drizzle on the edge of your bowl or a piece of parchment paper to check the consistency before pouring it over the entire cake roll. A perfectly executed ganache adds a touch of elegance and seals in the moisture, keeping your cake roll fresh and delicious.
From my years of baking experience, this Red Velvet Oreo Cake Roll is one of those recipes that never fails to impress. It combines the nostalgia of Oreos with the elegance of a traditional cake roll, creating something truly special. Whether you're making it for a holiday gathering, birthday celebration, or just because, it's sure to become a favorite in your recipe collection.
Recipe FAQs
- → Can I make this cake roll ahead of time?
- Yes! This cake roll can be made up to 3 days in advance and stored in the refrigerator. The flavors actually improve over time.
- → Why did my cake crack while rolling?
- Roll the cake while it's still warm to prevent cracking. If it cracks slightly, don't worry - the filling and ganache will cover any imperfections.
- → Can I freeze this cake roll?
- Yes, you can freeze it for up to 2 months. Wrap it well in plastic wrap and thaw overnight in the refrigerator.
- → Do I need to use red food coloring?
- While red food coloring gives the classic look, you can skip it. The cake will taste the same but won't have the red velvet appearance.
- → Can I use different cookies for the filling?
- Yes! While Oreos are traditional, you can experiment with other cream-filled cookies for different flavors.